Category: 1News

HVAC News-Learn about ATC products and services! The latest heavy duty mobile HVAC news, product features, how to procedures including technical tips.

How to troubleshoot your A/C Electrical system

Troubleshoot your A/C system without special tools or skills – On any vehicle and virtually any A/C system, electrical problems are among the hardest to troubleshoot. If you suspect an electrical problem with the A/C system, here’s a two-stage inspection routine that virtually anyone can do:

1. Inspect Electrical Connections

As you perform a visual inspection under the hood (cab) and/or at the rooftop condenser, take a moment to check all electrical connections both visually and by feel. Make sure all leads and wires are properly supported and securely connected, and that there’s no corrosion or grime on the leads or connectors.

2. Check Electrical Current Flow and Device Functions

Perform the following steps to check the current flow and electrical device functions:

  • Turn on the ignition
  • Turn on the A/C system. This will power the thermostat and clutch. If it does not come on, use the A/C mode switch to check the leads to the switch. You should hear a “click” from the thermostat and hear the clutch drive plate “snap” against the clutch pulley. 
  • Check fuses. If all the connections are clean and tight and there’s still a failure, check the fuses in-cab as well as in-line.
  • Check A/C clutch engagement. Since you can’t see and may not hear the clutch engage, get out and look at the clutch. If it’s engaged, you will see that the drive plate is against the pulley and not slightly spaced from it. If you aren’t sure the clutch is engaged, look for the lead wire connector near the clutch. Break and close that connection. The clutch will disengage and engage again.
  • Test blower speed operation. Some systems have a common switch that turns on the air conditioner and powers the blower motor. Test blower speed operation by adjusting this or the separate blower control switch. Feeling the air flow from the ducts or note blower sound (speed) changes.
  • Inspect roof-mounted condensers. Don’t forget to inspect roof-mounted condensers and A/C units for dirt and debris. Be sure the condenser fan(s) are working properly and all parts and electrical connections are securely fastened. The roof-mounted condenser fans may come on when the system is turned on. Like the thermostat and most clutches, the normal on-off cycling action cannot be observed until the engine is running with the A/C system on.

Once your visual inspection is complete, talk to a qualified A/C technician about what you found. Your troubleshooting efforts will be rewarded with a speedier repair and perhaps a lower repair bill.

Quick Heater Service Tip from RedDOT

  • When the status is “heater fan doesn’t work,” check the ground connection for rust, paint, grime, or some other obstruction at the terminus.
  • If the motor doesn’t have a ground wire, its mount serves as a ground connection. Make sure nothing impedes the mount’s ground path.
  • Use a multimeter to make sure you’re getting full voltage to the motor. Once you know the voltage is adequate, you can then look for worn brushes, dirty squirrel-cage fans, damaged fan blades, and other more typical motor problems.


Arctic Traveler Canada
is an MSD/Master Stocking Distributor and Authorized Technical representative for many industry-leading products. Call us today at 1-800-295-4156 to see what 55 years of excellence can do to achieve your business objectives.

A/C Hose repairs

Replacement A/C Hose lines don’t have to be from the Original Manufacturer!

How To Repair A/C Hose – In the past, it was difficult to find a supplier capable of doing AC hose repairs, but with today’s wide selection of high-quality fittings and hose, your replacement could be right here at ATC. The Air Conditioning System provides the desired cabin temperatures to ensure operator comfort. The AC hose is used to effectively transfer both liquid and gas between the components and should be inspected for leaks and either repaired or replaced ASAP, to ensure the system continues to perform as expected.

Click here to view an Aeroquip EZ Clip Demo from Reddot

Today, many hose sets come with metal tube sections, some of which we offer. If no suitable fitting is available, using a hose to replicate the metal tube is the next best thing.
Our experience suggests using Aeroquip hose and E-Z Clip may hold an advantage over crimp fittings for replacing metal tubes. Aeroquip EZ Clip & Hose fitting is a simple option for making or repairing Air Conditioning hose lines on heavy-duty trucks, agricultural, construction and other industrial applications. No hydraulic equipment is needed. Rather, a simple, easy-to-use crimping plier enables quick and easy A/C Hose repairs in the field.
Each Aeroquip fitting 
comes with 2 Clips which slide over the hose and a Cage which locks into the fitting, goes through the cages and is secured with crimper pliers.
AC Hose Repair with Aeroquip EZ Fittings - Clips and Cage - ATC Heavy Duty Parts & SuppliesAC Hose Repair with Aeroquip EZ Fittings - Clips and Cage - ATC Heavy Duty Parts & Supplies
This example shows an OE Hose at the top and using 4 Aeroquip fittings and hose, we can quickly provide a quality solution for your application.
AC Hose Repairs with quality fittings and hose. Call us today to see what our experience can do for you - 1-800-295-4156

The reduced diameter hose enables tighter turns (but not right angles) without concern for “kinks” which would compromise the hose and AC system.
AC Hose Repair using Aeroquip EZ Clip Fittings and Hose is a quick solution for the quick turn around needs and mobile technicians. Providing even greater flexibility, when the E-Z Clip fitting is lubricated with a slight amount of refrigerant oil before it’s inserted into the hose, the direction/index of the fitting can be changed by rotating the fitting in the hose. Once the refrigerant oil used has dried (1-2 hours) the fitting can no longer be turned or re-indexed.

Call ATC at 800-295-4156 for all your mobile heavy-duty HVAC parts, supplies and solutions – Burlington, Mississauga or Montreal.

Looking for OEM Replacement lines. Find application specific parts here!
Need an internal Hose Program ? Find more info here!

Blower Motors by Make

Blower Motors and Wheels are integral parts in the delivery and circulation of air in your vehicles Air Conditioning system. An Electric DC motor is used to circulate warm and cool air inside the cabin and/or sleeper. The Blower Motor “blows” and circulates the warm air from the fins of the heater core or cools the air as it passes from the fins of the evaporator.
Without these components, the hot or cold air produced by your air conditioning system won’t circulate to reach your vehicle’s interior cabin and or sleeper. We offer solutions for Freightliner, International, Kenworth, Mack, Peterbilt, Sterling, Volvo and Western Star. Review the fast moving replacements by Brand below or the full listing of replacement Blowers here.

TECH TIP Video:  Blower Motors – Common Reasons For Failures

Blower Motors by Make - Freightliner, International, Kenworth, Navistar, Peterbilt, Sterling, Volvo - Arctic Traveler CanadaBlower Motors by Make - Freightliner, International, Kenworth, Navistar, Peterbilt, Sterling, Volvo - Arctic Traveler Canada

Arctic Traveler Canada is a proven and trusted specialist in mobile climate control. We design, engineer, manufacturer and distribute a wide range of HVAC solutions for Commercial and Industrial applications. We offer replacement OE and AM parts & supplies for All Applications and Any HVAC system. Call ATC today at 1-800-295-4156 to discuss what’s possible and let our experience be your guide.

Other informative links
Best Selling HVAC Parts By Brand
OEM and AM Replacement A/C Hoses

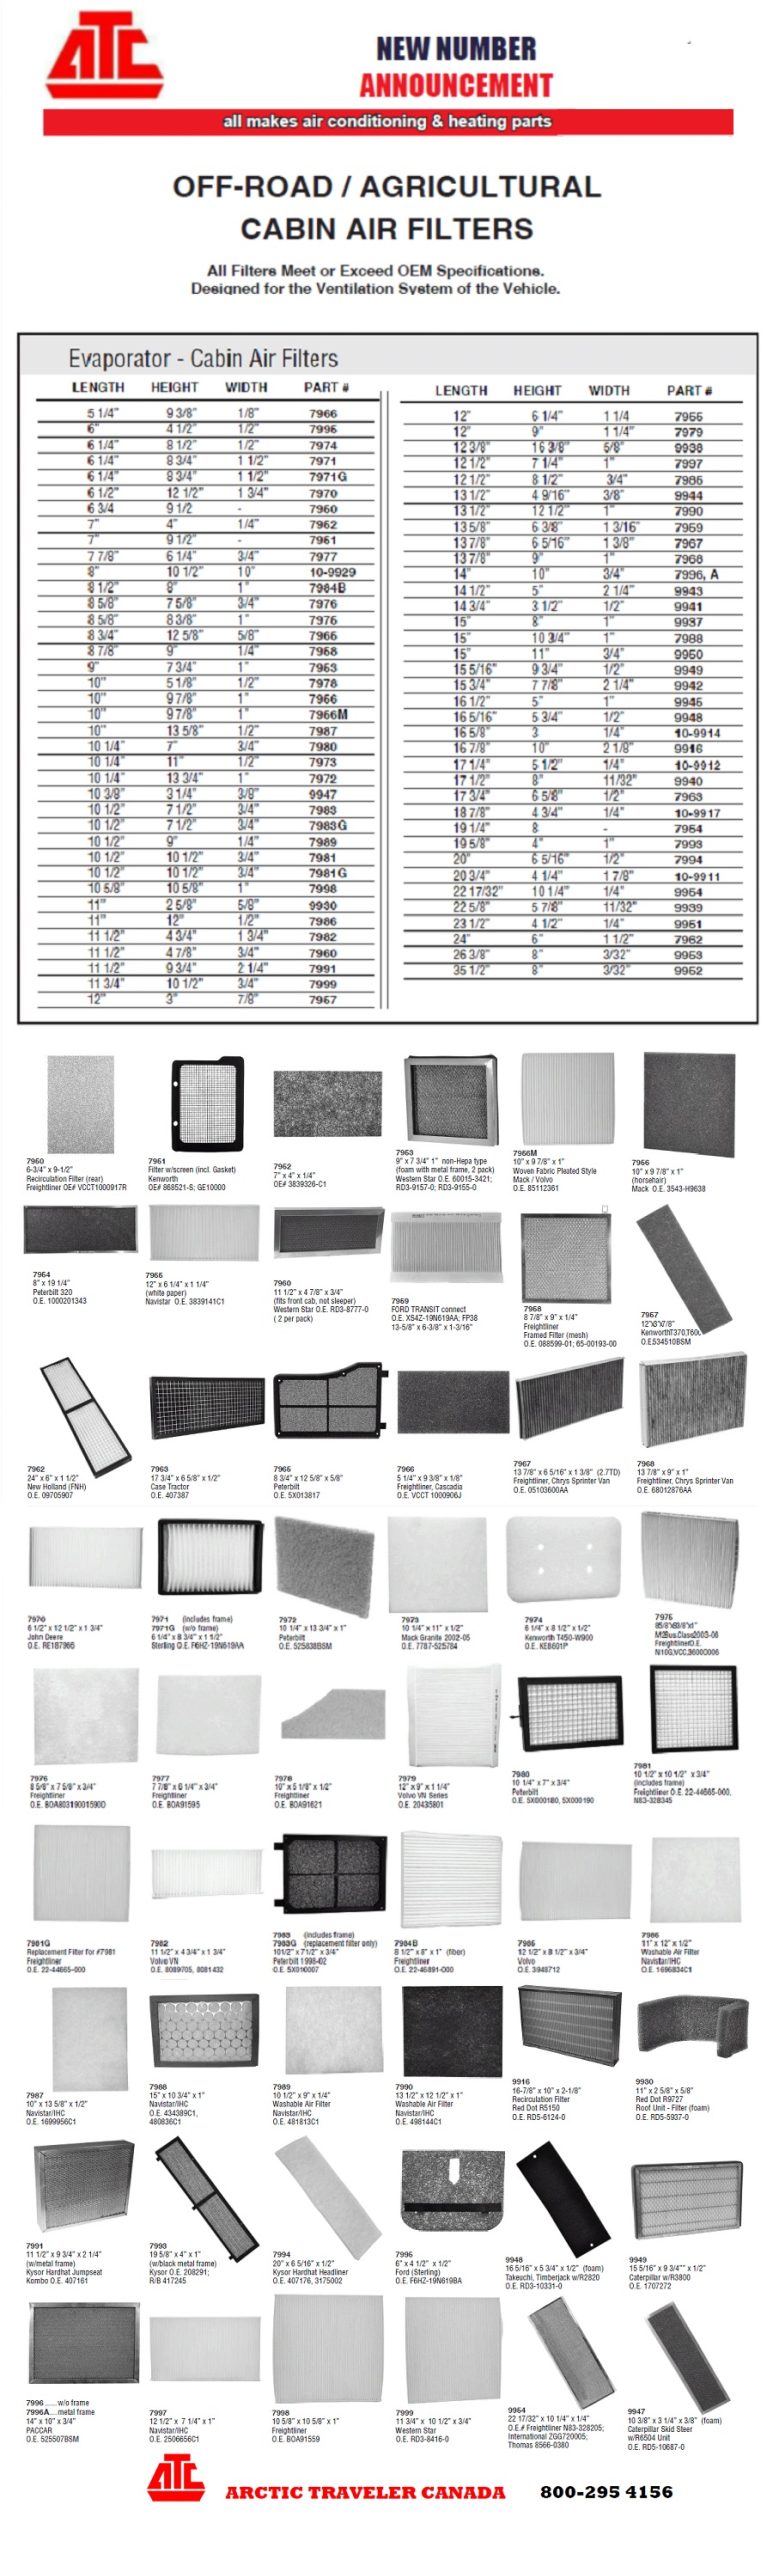
Cabin Air Filters

Cabin Air Filters – Increase A/C efficiency and Reduce dust, dirt and allergens

Replacing your cabin air filter is a relatively easy and inexpensive maintenance task that can significantly improve the air quality inside your vehicle. It’s generally recommended to replace it every 20-24,000Kms, or at least once a year, but you may need to replace it more often if you drive in dusty or polluted areas. Signs that your cabin air filter needs replacing include reduced airflow from vents, unpleasant odors, and increased allergy symptoms. 

A relatively new feature in the heavy duty industry, the cabin air filters are often overlooked in regular vehicle maintenance. That’s unfortunate because the cabin air filter is just as important to the passengers as the engine air filter is to the vehicle and a likely cause of “A/C Not Blowing Cold“. A cabin filter processes the air that enters the passenger compartment via the vehicle’s heating and air conditioning system, increasing passenger comfort by trapping particulates, pollen, and other irritants.

For people with allergies and other sensitivities to airborne agents, the cabin filter represents a significant advance. Replacing the cabin air filter at the recommended interval or sooner, especially in areas of high particulate, allows the A/C system to run at optimal efficiency and passengers to breathe cleaner, fresher air, which makes any journey more enjoyable.
Cabin Air Filters – Increase A/C efficiency and Reduce dust, dirt and allergens.

A/C Preventative Maintenance

When it comes to air conditioning, a good preventative maintenance program will increase operating time and save money by identifying concerns before they become problems. Once the hot weather arrives, implementing planned maintenance allows you to schedule repairs instead of reacting to sudden unexpected issues. A/C filters, coils, and fins require regular maintenance to ensure optimum performance and neglecting necessary maintenance results in a steady decline in performance and increased energy use. 

Filters

Clogged, dirty filters restrict airflow and reduce a system’s efficiency. When airflow is restricted, the air that bypasses the filter will carry dirt directly into the evaporator coil and reduce the coil’s heat-absorbing abilities. To ensure efficiency, routinely clean or replace filters.

Coils

The condenser and evaporator coils collect dirt over time but a clean filter helps to keep the evaporator performing well. Debris reduces air flow, insulates the coil and reduces its ability to absorb heat. Being exposed to the elements, it is easy to see the dirt collecting on the fins. Cleaning the coil fins and removing any debris around the coil will ensure optimal performance.

Coil Fins

The aluminum fins on evaporator and condenser coils are easily bent and can block airflow through the coil. Air conditioning wholesalers sell a tool called a “fin comb” that will comb these fins back into their original condition.

Remember to always use caution when performing preventative system maintenance, as ambient conditions (heat load) will increase refrigerant hose temperatures and don’t forget, having the right quality parts on hand makes all the difference.

See How To and Which Components to Inspect and watch this video to learn more about Basic A/C Troubleshooting.

A/C Preventative Maintenance - a regular HVAC PM program will save you money and decrease down time.

A/C System – How a simple inspection can save

RedDot

Tech Tips From RedDot

Heavy-duty A/C system components rarely fail. In fact, the system fails the components because of contaminated refrigerant oil and general lack of preventive maintenance.

One of the best ways to improve uptime and reduce maintenance costs for the customer is to promote a basic visual check of major A/C components, hose connections, and fittings at regular intervals, like with every engine-oil change. This inspection routine has another benefit: it can generate business for your parts and service department. 

Many A/C components are consumable items. It’s more cost-effective to replace them than to repair them. So preventive maintenance is an opportunity to sell a range of OEM-quality all-makes replacement parts for the air conditioner. Here are some examples:

1. RECEIVER DRIERS

The receiver-drier’s moisture indicator provides a quick visual cue about the refrigerant’s condition: a blue dot means the refrigerant is dry; pink, white, or grey indicates acid or moisture in the system. Checking the sight glass during an oil change or any scheduled maintenance procedure means the truck can receive necessary service while it’s there in the shop, before moisture and acid damage critical A/C components and lead to a failure on the road.

2. CONDENSERS

Dust, bugs, feathers, and other debris collect on the face of fins and tubes and act as a thermal barrier, making it hard for the condenser to shed heat. Condensers also fail because of vibration, which can cause hose connections to come loose and fatigue the condenser tubing adjacent to the fittings. Every 12 months, the condenser should be cleaned (taking special care not to bend or damage the fins) and the hose connections securely clamped.

3. COMPRESSOR/CLUTCH ASSEMBLY

The compressor provides the mechanical energy to circulate refrigerant and manipulate the pressure inside the system. It’s the heart of the A/C system, and the No. 1 HVAC maintenance expense item. Excessive noise and poor cooling performance are the two most obvious symptoms that a compressor is failing. Replacing the compressor involves pulling down the system, which adds refrigerant recovery and recharge to the repair cost.

Next time you see, “A/C won’t blow cold air” on a work order, note that the repair and downtime probably could have been avoided with a simple visual inspection of the truck’s air conditioning system. Any time you change the truck’s oil, check the A/C.

Arctic Traveler Canada is a master distributor and technical service expert for many of our suppliers.
Call us today at 1-800-295-4156 to find your HVAC solutions.

More Tech Tips
A/C Preventative Maintenance Tips from RedDOT 
How To Inspect an A/C Compressor
A/C Compressor Check Up
How To Troubleshoot your A/C Electrical system
Why Do a Winter time PM on your A/C System

A/C Compressor Check

Wondering why your system has a low refrigerant charge?

It could be because of a leak that needs repair, or a high-side blockage that limits refrigerant flow to the compressor. Diagnose those problems first, and if not resolved, perform this simple 4 step A/C compressor function check, before you remove the compressor from a vehicle. 

Service Tip: Remember when you open the A/C system, you should change your filter drier to remove contaminants and minimize damaging moisture in the system.
AC Compressor - The heart of your air conditioning system.

4 step tech tip

1. Is the compressor rotation smooth? With the vehicle off, turn the compressor shaft with a 14-mm socket. If you feel grinding or hanging as you rotate the shaft, there may be broken components within the compressor. If the rotation is smooth, move on to Step 2.
 
2. Is the coil getting more than 11.5 volts? Take a reading with the engine running and the clutch engaged. If there’s insufficient voltage, get to work on that. Otherwise, move on to Step 3.
 
3. Is the coil resistance between 2.8 and 4.4 ohms for a 12 vdc system and 11.2 to 17.6 ohms for a 24 vdc system? Any resistance outside these ranges will prevent the clutch from engaging or will cause used circuits to open. If the resistance measures correctly, continue to Step 4.
 
4. Is the compressor able to produce 350 psig or more? The compressor should be able to build over 350 psig on the high side with the condenser airflow restricted, and also able to pull the suction side down to 5 psig when the TXV is closed. If needed, the technician can close the TXV by chilling the charge head using a can of dust-off held upside-down.This will temporarily freeze the TVV charge head and cause it to close. If the compressor is operating correctly, the suction pressure will drop below 5 psig.

Need more info. Go to our blog, ATCNEWS or view more tips on the links below

Arctic Traveler Canada has a complete line of replacement parts & HVAC systems for all makes, any HVAC Part or System. Call us today for more information .  

Custom Coils Canada Replacement Coils

Replacement Coils & Heat Exchangers don’t have to be from the original manufacturer.

For over 30 years, Custom Coils Canada has produced replacement condensers, evaporators and heater cores for almost any mobile, commercial or industrial application. In the past it was difficult to find a manufacturer capable of making replacement coils but with today’s manufacturing processes aided by Computer Aided Design (CAD), consumers have quality choices, at competitive prices. 

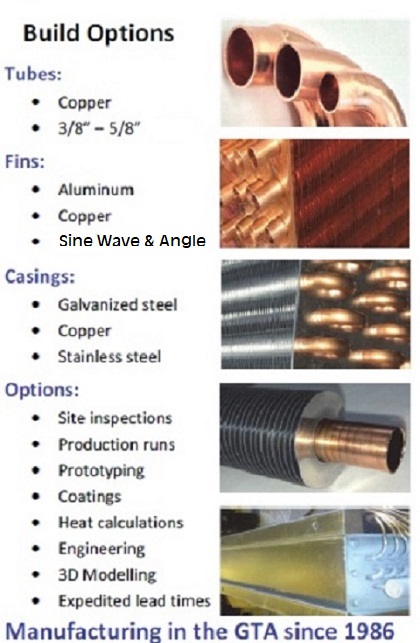
This TK210Carrier replacement is an intricate combination Radiator & Condenser Coil (08-60086-04-SP). It hi-lights some of our abilities and proves what 30 years of experience can do for you. See Build Options below.
Replacement TK210Carrier Combination Radiator & Condenser Coil 08-60086-04-SP

Custom Coil Canada (CCC) – Operates as an independent division of ATC and produces heat exchangers used on Arctic Traveler Canada and Advanced Temperature Control products, providing a unique capability of being able to react quickly to specialized requests. 

Custom Coils Canada produces tube and fin replacement condensers, evaporators and heater cores. Custom Coils Canada specializes in building unique heat transfer coils and aftermarket drop in replacements for high priced OEM coils or as replacements for overseas manufacturers that no longer have parts available in the local markets. We specialize in short run production quantities for small to medium size manufacturers, one-off replacement coils and quick turn around repairs for HVAC, Plumbing and Mechanical Contractors. 
Replacement Coils & Heat Exchangers Build options for Condensers, Evaporators, Heater Coils, Radiators for Commercial, Industrial, Marine & Residential applications.

CCC services the replacement coil market in the GTA with the ability to produce replacement coils within one week (expedited orders). These can be standard HVAC coils or heavy duty designs using our Grilldenser fin which is capable of being pressure washed for harsh environments. Additionally, all of our coils can be coated (options available) for dramatically improved corrosion protection. 

We can produce the following types of coils, using copper tube and aluminum fins:

  • Hot water coils
  • Chilled water coils
  • Evaporator coils
  • Condenser coils
  • Low pressure steam coils
  • Non-Freeze Coils
  • Internally Rifled Tubes
  • Custom made coils

We’re able to do site visits and build replacement coils based on samples provided and our staff support includes engineering personnel using SolidWorks 3D modeling software, who can also conduct coil heat load calculations and design.

Whether you need individual coils, large coils for heating and cooling buildings or production runs for retrofitting an entire building or complex, if you’re in need for replacement coils or a type of heat exchanger, we can help.
View complete Replacement Coil Build Options here or Call Custom Coils Canada at 905-789-8523 to discuss your needs.