Tag: A/C and Heating HD Parts

Arctic Traveler Canada distributes a broad range of replacement mobile AC and Heating HD parts for all types of commercial & industrial vehicles.

Conversion of R-134A to R-1234YF

Conversion from R134A to R1234YF

An Update on the Future of Refrigerant – R-134A to R-1234YF from RedDOT.

The conversion from R-134A to R-1234YF has everything to do with increasing concerns about the environmental impact of these refrigerants. Three decades ago, R-12 was the industry standard. It was found to cause a depletion of the ozone layer, so R-134a was adopted since it did not contribute to ozone depletion. This solved the problem…or so we thought. 

Several years later, it was concluded that many man-made gases were contributing to global warming, and R-134a was one of those contributors. A search for a refrigerant that is both friendly to the ozone layer and doesn’t contribute to global warming was started. R-1234yf solves both of those problems.

The transition away from R-134a refrigerant continues to be a key focus for the heavy-duty vehicle industry as we work toward reducing greenhouse gas emissions. While R-134a remains approved for off-highway applications, its phase-out for newly manufactured vehicles is on the horizon. By 2028, all newly produced off-highway vehicles will no longer use R-134a, marking a significant shift in mobile HVAC systems. 

Note – R134a and R1234yf are NOT interchangeable

Conversion of R134A to R1234YF. refrigerant charging ports for Mobile HVAC systems.

The EPA originally approved R-1234yf for use in passenger cars at the end of 2020, and since then, it has fully replaced R-134a in that market. However, R-1234yf is not yet approved for Class 6, 7, and 8 trucks. The EPA currently has an application under review for its approval in these larger vehicle classes. Once approved, this transition will play a vital role in reducing the environmental impact of mobile HVAC systems. For context, R-134a has a Global Warming Potential (GWP) of 1,430, whereas R-1234yf has a GWP of only 4. Additionally, while R-134a remains in the atmosphere for around 13 years, R-1234yf breaks down in just 11 days, significantly reducing its environmental footprint. 

The good news is that both refrigerants perform very similarly in mobile HVAC applications, but R-1234yf offers a clear environmental advantage. 

What Technicians Need to Know

  • Newer systems have very small capacities and are much less prone to leakage. This means that technicians need to take care not to overcharge the system. Many OEMs recommend service only every three years. The days of an annual top-off are over.
  • Newer systems require newer equipment to service them. Refrigerant recovery machines must comply with the latest regulatory standards and are to be operated only by licensed technicians. These machines can detect which type of refrigerant is present. Refrigerant types are not to be mixed. 
  • The usage of dyes and sealants is discouraged. Dyes and sealants are considered contaminants and will reduce the performance and longevity of the lubricant. Use refrigerant sniffers for leak detection and repair leaking equipment per SAE and EPA guidelines.
  • BG Frigi-Quiet® for R-1234f, PN 702, is not approved for use in HEV or EV vehicles. These vehicles require the use of lubricants that pass proprietary electrical insulation performance standards, which PN 702 does not possess.

This change in automotive refrigerant technology has been the talk of the industry for several years. 
R-1234yf will be the industry standard for the foreseeable future. As the industry prepares for these regulatory changes, we encourage customers to stay informed and take advantage of resources like the Mobile Air Climate Systems Association (MACS), which offers a comprehensive certification program on its website.

For more information on Air Conditioning, Filtration & Pressurization, Heating  or Refrigeration, call the mobile HVAC specialist Arctic Traveler Canada at 800-295-4156.

More Tech tips
AC Preventative Maintenance 

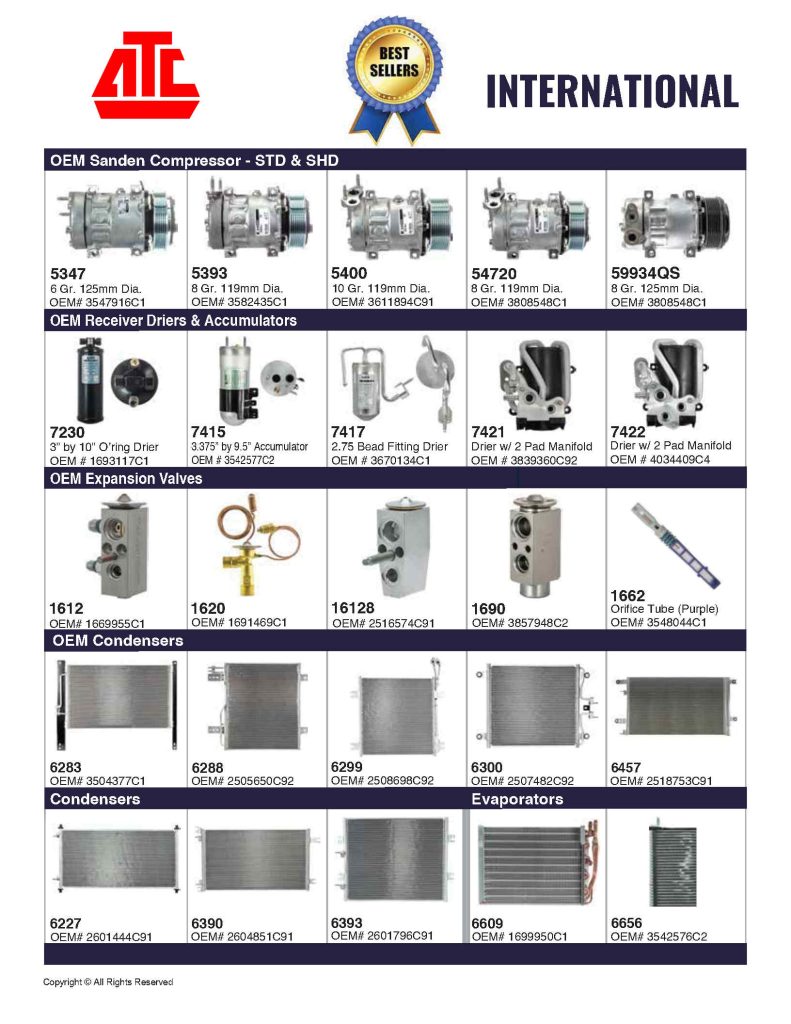
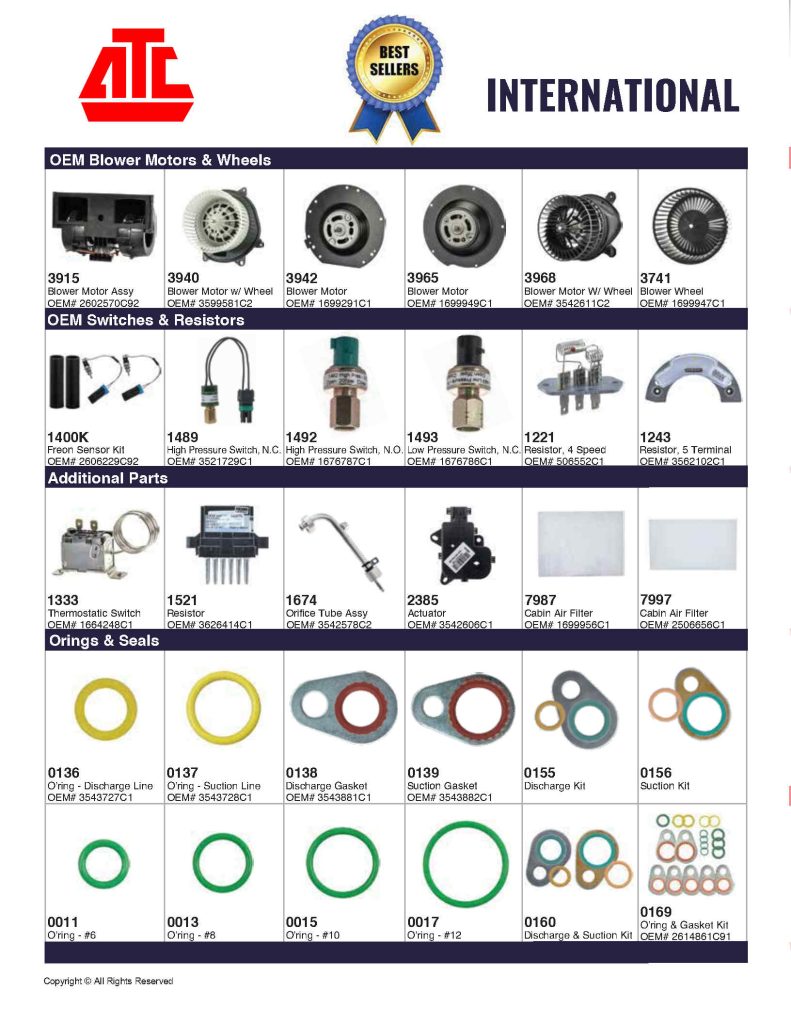
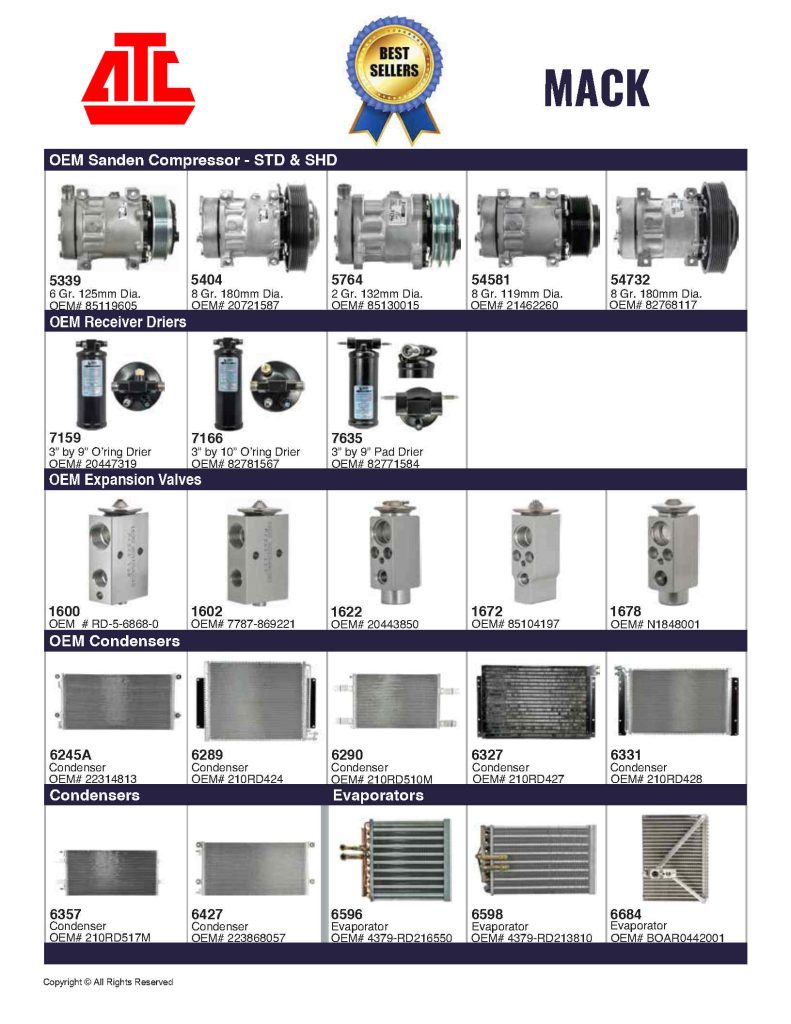
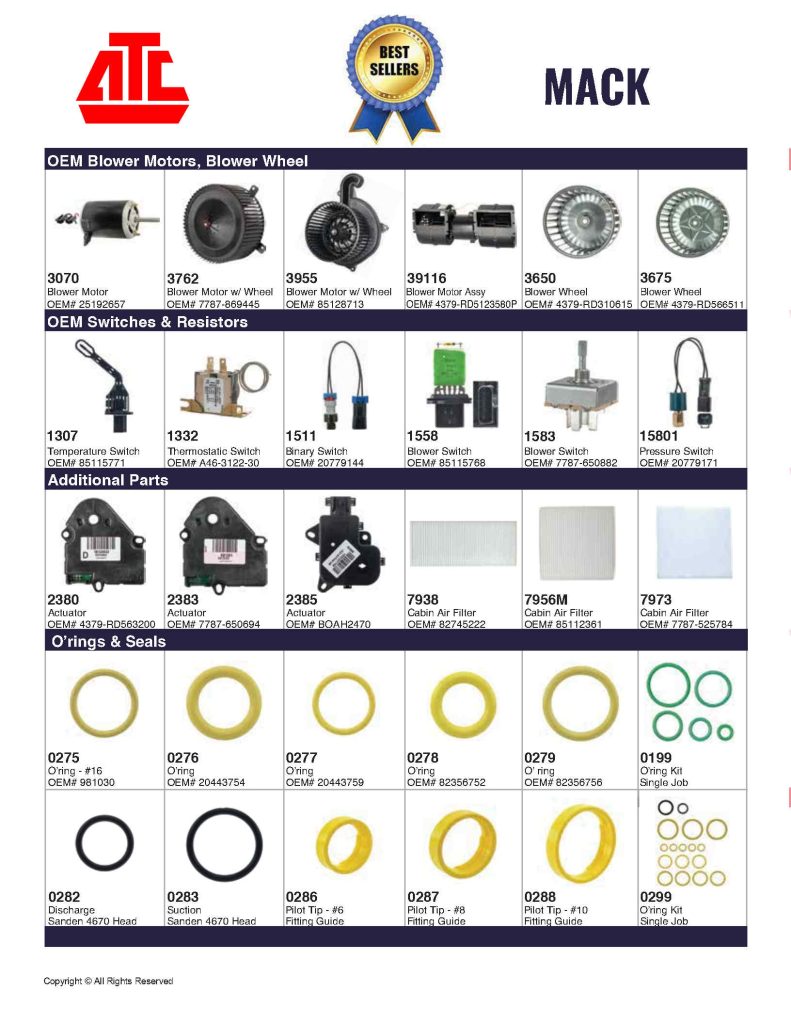
Best Selling Mobile HVAC Parts By Make
Spring HVAC Tech Tips

On YouTube

How To and Which Components to Inspect 
Basic A/C Troubleshooting.
Best Selling Mobile HVAC parts by Make

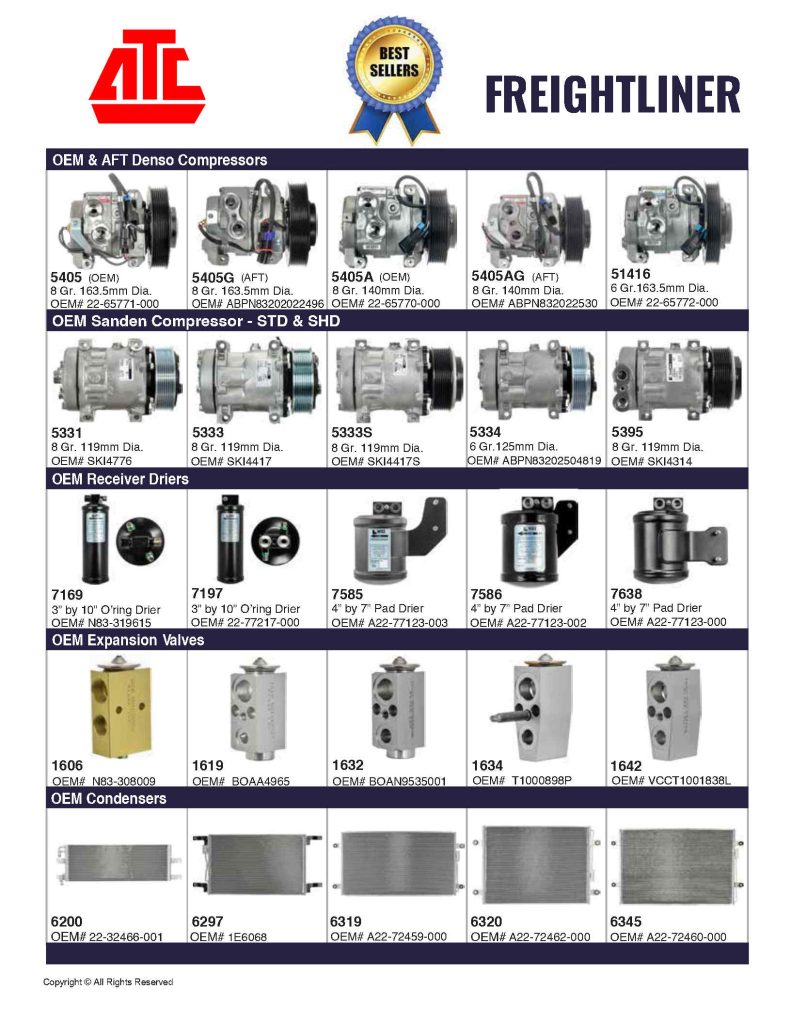
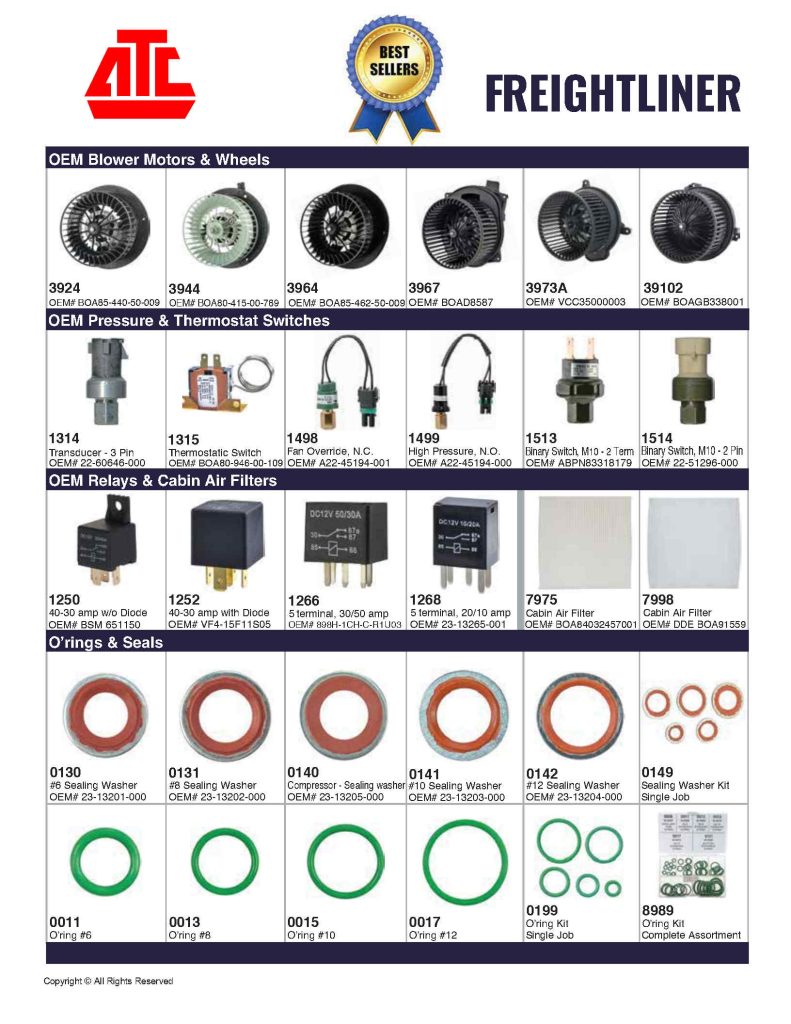
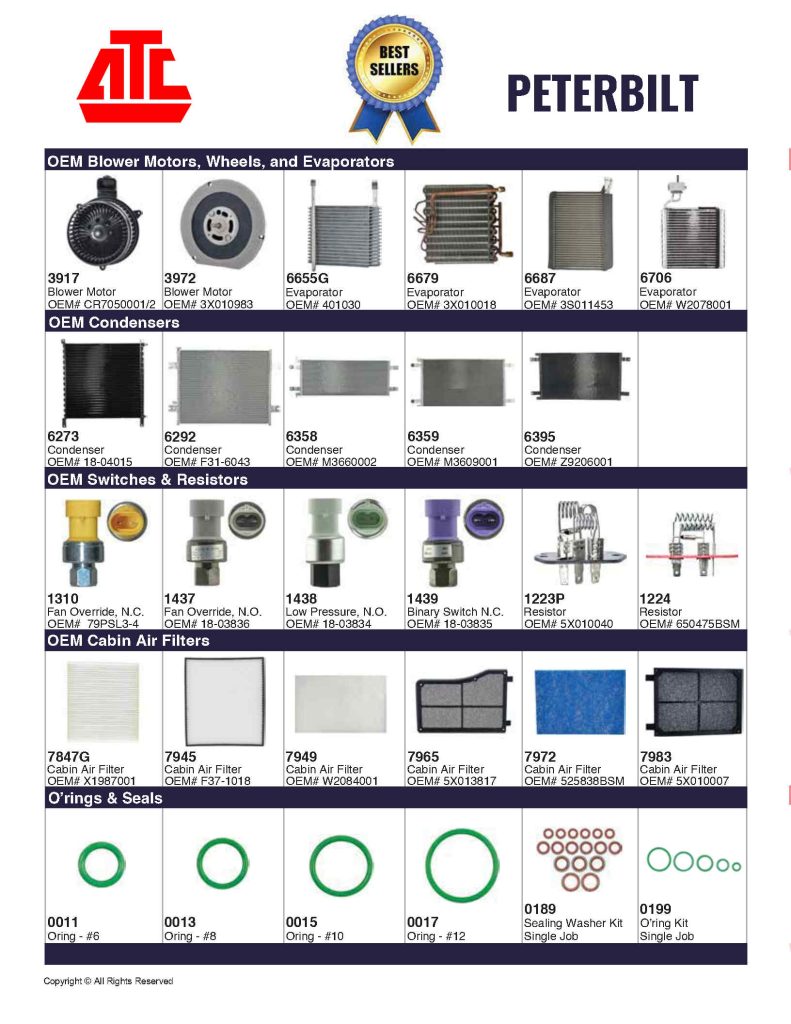
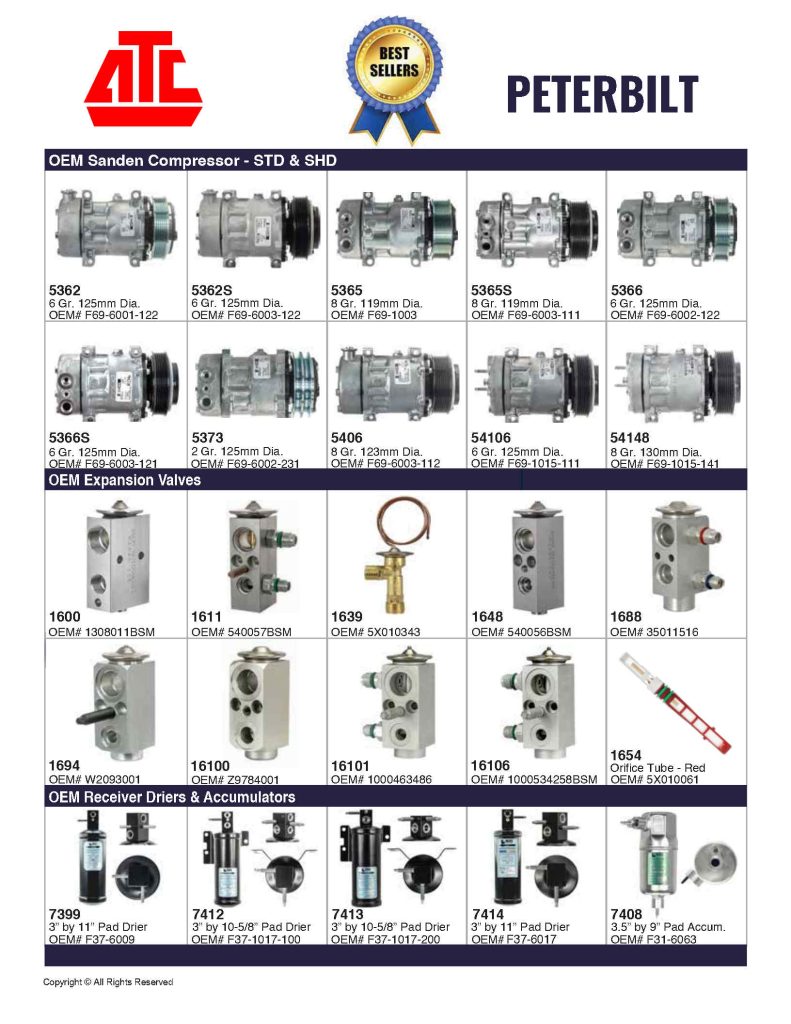
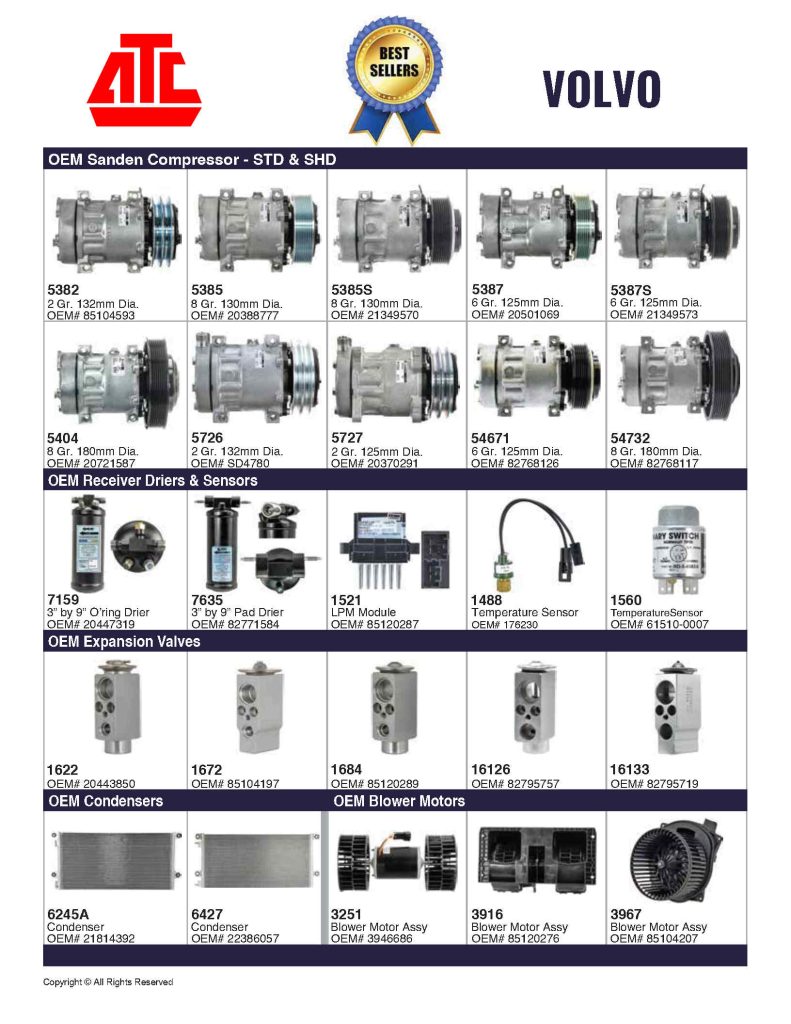
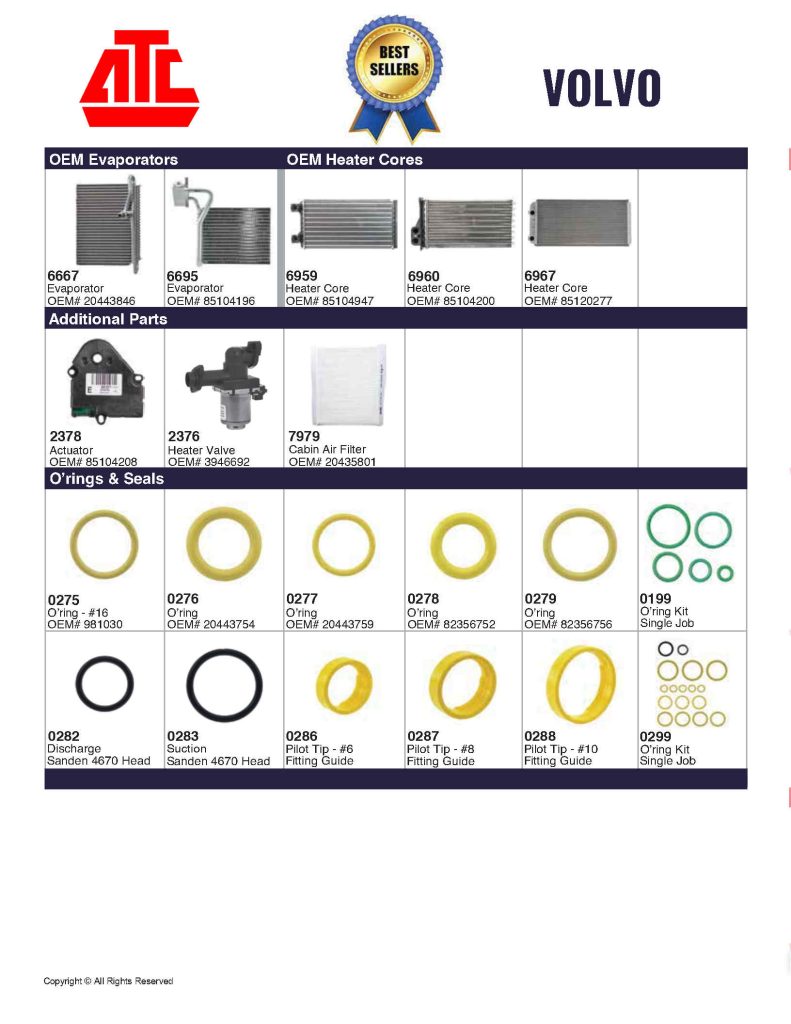
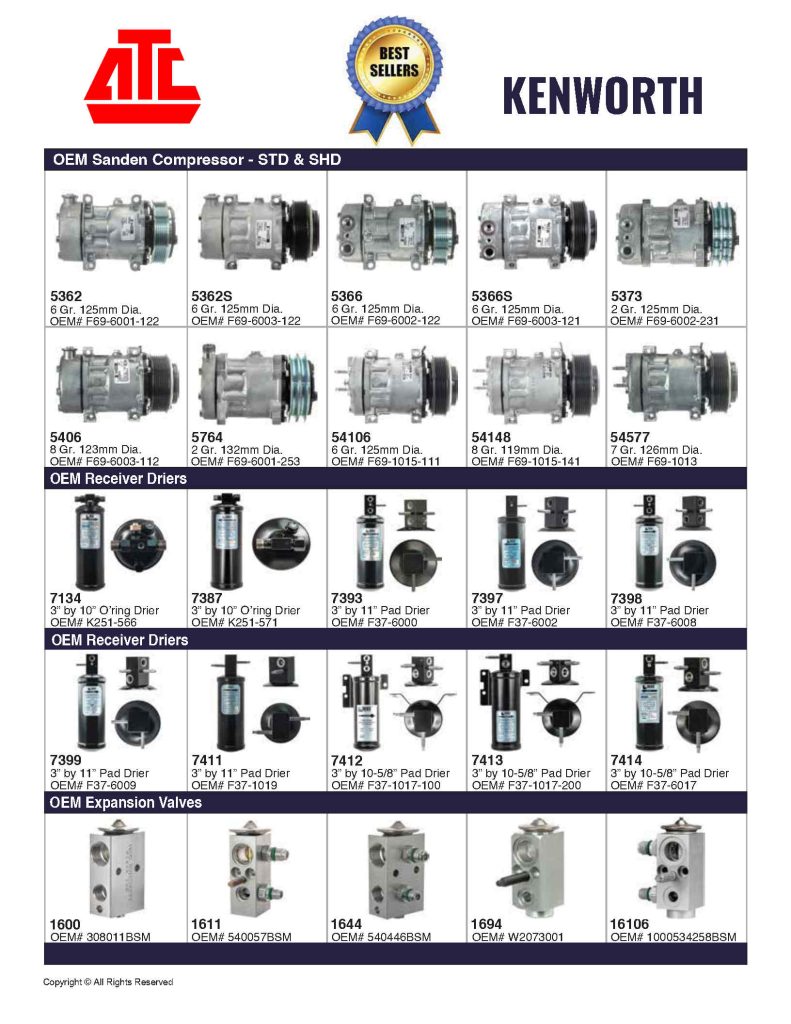
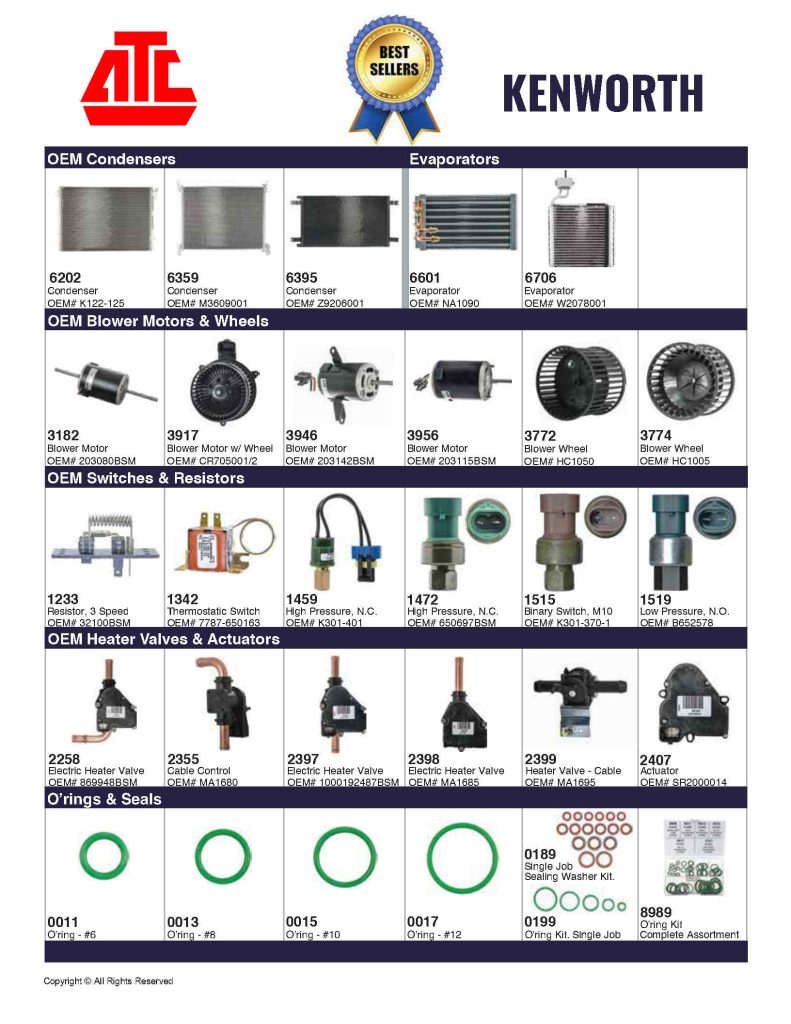
Need HVAC parts for Freightliner, Kenworth, International, Peterbilt, Sterling, Volvo, Western Star and more!
Having the right part is paramount to getting the job done right and to help with your choice, we offer Best Selling Mobile HVAC parts by make featuring Denso, Sanden & York Compressors, Clutches, Condensers, Expansion Valves, Receiver Driers and so much more. 

We’re the source for all your HVAC products for Heavy Duty, Medium Duty, Off-Road, Agriculture and Buses.
We manufacture and distribute an extensive line of high-quality original equipment from industry-leading brands and aftermarket HD HVAC parts and supplies for Any Truck, Any HVAC System or Any HVAC Part.
Call 800-295-4156 for more details. 

Engineered HVAC Products

Engineered HVAC products are designed and built for air conditioning, heating, ventilation, air filtration & cab pressurization solutions for heavy duty equipment. We offer a variety of products from individual components parts like Condensers, Hydraulic Compressors, Cab Pressurizers, Evaporators & Heaters to self-contained systems with a wide range of HVAC solutions for Commercial and Industrial applications in Agricultural, Construction, Forestry, Mining and Emergency Services. Our solutions are designed specifically for OEM’s, aftermarket use and built to provide reliable service in extreme conditions.
View the full catalog here https://atc.ca/product-lines/omega/ or contact us for more info.

Engineered HVAC parts for heavy duty equipment like Condensers, Hydraulic Compressors, Cab Pressurizers, Evaporators & Heaters.

Engineered  HVAC products

Engineered HD HVAC products from ATC are an innovative line of heating, ventilation, and air conditioning equipment. These products are designed specifically for heavy-duty applications. Unlike standard HVAC systems intended for homes or small businesses, our engineered Heavy Duty HVAC products are built to withstand the demanding requirements of large commercial and industrial facilities.

These high-capacity HVAC systems are rugged and feature heavy-gauge steel cabinets, high-efficiency motors and compressors, and industrial-grade components selected for durability and performance under continuous operation. Dual refrigeration circuits allow for uninterrupted operation if one component fails to ensure redundancy. Programmable logic controllers monitor conditions and automatically optimize performance.

Our HD HVAC technology allows these systems to heat, cool, humidify, dehumidify, ventilate and filter air for the most optimal comfort and indoor air quality. Recommended applications include airports, hospitals, data centers, factories, warehouses, sports arenas; any large spaces with unique HVAC needs would be a good fit. Custom engineering ensures that the system is sized properly and designed for that facility’s specific layout, climate, occupancy, and expected usage.

Engineered HD HVAC products from ATC feature robust construction and customizable designs. These Heavy Duty HVAC systems deliver reliable climate control to meet the most demanding HVAC challenges. This advanced equipment keeps our customer’s large-scale facilities operating in peak condition year after year.


Other Engineered products
Air Filtration & Pressurization 
Compact Heater
Under-seat Heater

Omega Canada
is a proven and trusted specialist in mobile climate control. We engineer a wide range of HVAC solutions for Commercial and Industrial applications. Call  1-800-295-4156 to discuss what’s possible and let our experience be your guide.

SPRING HVAC Tech Tips from RedDOT

Spring HVAC Tech Tips to ensure your AC system and its components perform optimally. Spring has officially sprung and the shift from cold to warm weather can prove impactful to mobile HVAC systems. Following best practices will help to weather even the most extreme seasons and keep your AC systems operating optimally. Read on for some technical tips on maintaining system integrity.  
 

  1. Close your HVAC’s water valve 

During winter, many people will keep their water valves open as they use their heating system. An important part of the shifting weather is to ensure that your water valve is operational and closed. When left open, the system will emit warm air even when the A/C is turned on. 
 

  1. Check for refrigerant leaks 

Most HVAC systems haven’t had their A/C turned on for months because they’re just used for heat during the winter. If an A/C system sits idle for extended periods of time, it can lead to the system’s refrigerant leaking out of the face seal. To check for a refrigerant leak, look for traces of oil on the system’s fittings, or use an electronic leak detector and check the service ports and charge ports where the gauge set is attached. 

  1. Inspect compressor belts for wear and tear 

Since A/C compressor belts are made of rubber, with time and use they will begin to eventually wear and will need to be replaced. Be sure to check the belt for any cracks, abrasions or glazing that will indicate wear and tear. You should also check your compressor belt for proper tension because too much tension will put too much side load on the clutch bearings and cause a leak, whereas too little tension will cause the belt to slip and generate heat, burning off the belt or clutch. 

  1. Ensure proper airflow 

Air filters should be cleaned every time a vehicle undergoes an inspection to ensure proper airflow and the quality of air that an operator will be breathing. It’s also important for air inlets in the operator cab to remain free from obstructions. Air inlets are usually behind the driver’s seat and can be unintentionally covered up by the vehicle operator. If you put your lunch, dog, coat, etc. behind your seat, you may block the inlet and prevent your A/C from properly blowing air.     

For more information on Air Conditioning, Filtration, Heating & Pressurization, call the mobile HVAC specialist Arctic Traveler Canada at 800-295-4156.

More Tech tips
AC Preventative Maintenance 

How To Inspect an A/C Compressor
A/C Compressor Check Up
How To Troubleshoot your A/C Electrical system
Why Do a Winter time PM on your A/C System

On YouTube

How To and Which Components to Inspect 
Basic A/C Troubleshooting.
ESPAR Airtronic Heaters – Preventative Maintenance

Arctic Traveler Canada is a master distributor and technical service expert for ESPAR Airtronics and Hydronics Heaters.

Preventative Maintenance For Espar Airtronic Heaters

It’s recommended that Espar Airtronic heaters receive a pre-season check-up to ensure the heaters are ready for a trouble-free cold weather season. Always use the recommended tools and follow the procedures as outlined in the manual while removing and reinstalling the heater components. 

ESPAR Heater TipRegardless of the season, run the heater every month for a minimum period of 15 minutes. This will help the heater burn away any combustion residue in the burner chamber, prevents corrosion in the waterjacket and decay of “O” rings. It also ensures that fuel in the lines to the heater does not gel and solidify and that the heater will start reliably when the heating season arrives.

The heaters should be inspected and repaired by an Espar trained mechanic, as follows:
1. Before the initial operation, ensure that the heater is not being subjected to external loads by heavy objects being placed over it. This may cause damage to the heater parts and affect its normal operation. Ensure that sufficient clearances, as recommended in the heater manual, are being maintained around the heater, even while the vehicle is in operation.

2. Check the return air inlet port and the hot air outlet port for any blockages. Inspect the length of ducting for any damage and replace as necessary. Ensure all ducting connections are secure. Discourage heat sensitive materials from being placed too close to the heater, ducting components or hot air outlet ports.

3. Check all electrical connections from the heater to the batteries. Check for wear and abrasion along the length of the harnesses. Repair or replace the harness whenever the harness insulation is broken or damaged. Check the battery connections. Clean any corrosion at the terminals. Replace the battery terminals if the corrosion is severe. Check the fuse for corrosion and the correct rating.

4. Remove the glow pin and, if necessary, clean it. If the glow pin shows signs of dissimilar colour or distortions, replace it. Inspect the glow pin wires for damage and if necessary, replace it. Remember to clean the glow pin chamber and ensure the glow pin ventilation hole is clear of any obstructions, then replace the glow pin.

5. Regardless of its condition, remove and replace the glow pin screen every pre-season. Make sure that the new screen is installed correctly. Install the new screen.

6. Check the condition of the exhaust pipe. Look for any holes or breaks in the exhaust piping. Replace if necessary. Ensure the exhaust pipe is securely located and correctly routed.

7. Check the condition of the combustion air intake tube. Clear any blockages. If damaged, replace it. Ensure that the combustion air intake tube is securely located and correctly routed.

8. Ensure the mounting angle of the fuel pump is in between 15-35 degrees. An incorrectly mounted fuel pump may lead to excessive carbon issues. Check the fuel lines for possible leaks, loosened clamps, etc., inspect the filter on the suction side fuel pump filter, clean or replace it as necessary. Once the entire fuel system has been checked and any issues corrected, it is advisable to do a fuel quantity check.

9. If the fuel quantity result is above specification, then it will be a cause for excessive carbon issues and the fuel pump would need to be replaced. If the fuel quantity result is within specifications, but on the higher side, then any possible excessive carbon issues may be corrected by increasing the mounting angle of the fuel pump to the near vertical position. If the fuel quantity result is below specification, then it is recommended that the fuel pump be replaced, but only if the heater repeatedly flames out during operation.

10. If there are complaints about the heater smoking excessively during operation, then remove and check the condition of the burner. The burner should be light brown in colour. Clean any carbon buildup inside the burner tube. Check the inside of the heat exchanger and scrape out any loose carbon.

11. When reassembling the burner and the heat exchanger, use a new thermal insulator. Likewise, when reassembling the blower motor assembly use a new blower gasket.

12. Reassemble the heater and test operation. The heater should be bench tested for 15-20 minutes before returning the heater to the vehicle.

Preventative Maintenance procedures – see below to ensure all your Eberspaecher heaters perform as expected.
Hydronic Heaters Preventative Maintenance

Carbon Build up – How to check and remove

Arctic Traveler Canada is an MSD (Master Distributor) for Eberspaecher productsand a technical leader actively involved in projects driving the mobility of tomorrow. Call 1-800-295-4156 for more information about mobile heating solutions.

ESPAR Hydronic Heaters – Preventative Maintenance

Espar’s Hydronic Heaters uses the vehicles coolant system to pre-heat the engine coolant to allow for effective vehicle starting in extreme climates. With some modifications, vehicles can be configured to allow for warming the passenger compartment through the existing vehicle heating system.

Espar Hydronic heaters are integrated into the cooling system of the engine and work independently of the engine, thus offers pre-heating of the engine and the vehicle’s passenger compartment. The thermal energy gained is then distributed through the vehicle’s own heat exchanger as forced hot air which heats the interior of the vehicle via existing air vents. The engine is warmed up with the residual heat in the cooling water.

ESPAR Heater TipRegardless of the season, run the heater every month for a minimum period of 15 minutes. This will help the heater burn away any combustion residue in the burner chamber, prevents corrosion in the waterjacket and decay of “O” rings. It also ensures that fuel in the lines to the heater does not gel and solidify and that the heater will start reliably when the heating season arrives.

Pre-Season Preventative Maintenance For Hydronic Heaters 

Before the cold weather arrives, it’s recommended that your Espar HYDRONIC  heaters receive a preseason check to ensure the heater is clean, free running and ready for a trouble-free season. Please use the recommended tools and follow the procedures as outlined in the heater manual while removing and reinstalling the different heater components.The heaters should be inspected and repaired by an Espar trained Technician, as follows: 

1. Check all electrical connections from the heater to the batteries. Check for wear and abrasion along the length of the harnesses. Repair or replace the harness whenever the harness insulation is broken or damaged. Check the battery connections. Clean any corrosion at the terminals. Replace the battery terminals if the corrosion is severe. Check the fuse for corrosion and the correct rating.

2. Check all clamps and hoses. Replace as required.

3. Check the condition of the exhaust system. Check for holes and breaks in the exhaust piping. Replace the exhaust as necessary.

4. Check the fuel pump filter ‐ clean or replace it as necessary. For heaters with external fuel pumps, ensure that the mounting angle of the fuel pump is in between 15‐35o. An incorrectly mounted fuel pump may lead to excessive carbon issues. Check the fuel lines for possible leaks, loose clamps, etc. Once the entire fuel system has been checked and issues, if any, are corrected, it is advisable to do a fuel quantity check.

5. Check and clear clogged weep holes on the side of the heater body. Look for any indication of coolant leakages. If leakage is suspected then remove the cover with water pump assembly and inspect and replace “O” rings on the water pump housing. Closely inspect the heater waterjacket for leakages and replace the “O” ring between waterjacket and heat exchanger. If the waterjacket is cracked, replace it.

6. Remove and replace the glow pin screen. Make sure that the new screen is installed correctly as outlined in the repair manual for the heater.

7. Remove and check the glow pin. If it shows signs of dissimilar colour or if the glow pin is in any way distorted, replace it.

8. The coolant pump should be removed and the impeller checked for damage. Any dirt or metal particles on the impeller magnet should be removed and the cavity in the pump should also be cleaned. Please Note: coolant pumps are not covered by warranty if the vehicle’s coolant system is excessively contaminated. Refer to Technical Circular 250.

9. Remove the flame tube and check the condition of the flame tube end. The flame tube should be light brown in colour with no excessive carbon at the end of the flame tube. Check for carbon build up on the burner “nose” at the cold end of the flame tube. Any carbon covering the air slots should be removed. Check the inside of the heat exchanger and scrape any loose carbon out from between the fins in the heat exchanger. Re‐install the flame tube replacing all gaskets.

10. Re‐assemble the heater and test operation. The heater should be bench tested for 15‐20 minutes before returning it to the vehicle.

Preventative Maintenance procedures – see below to ensure all your Eberspaecher heaters perform as expected.
Airtronic Heaters Preventative Maintenance
Carbon Build up – How to check and remove

Arctic Traveler Canada is an MSD (Master Distributor) for Eberspaecher productsand a technical leader actively involved in projects driving the mobility of tomorrow. Call 1-800-295-4156 for more information about mobile heating solutions.

Carbon buildup. Remove it to increase heater performance

Arctic Traveler Canada is a master distributor and technical service expert for Eberspaecher Airtronic and Hydronic Heaters.

Carbon buildup can decrease heater performance and reduce operator comfort.

In the event that the burner / flame tube and combustion chamber of the Airtronic D2 or D4 becomes restricted and the heater fails due to carbon/soot build up it may be possible to clean the burner without disassembling the heater by running the heater in high using Kerosene instead of Diesel.

To help identify when a burner has excessive carbon build up, Click here and follow the recommendations.

Since the replacement of a burner with carbon build up is not covered by warranty unless the carbon was caused by a defective heater or component this bulletin will assist in reducing the cost and time of cleaning a burner that has caused the heater to fail due to excessive carbon build up.

The excessive build‐up of carbon in the heater is not a result of normal operation of the heater. The build‐up of excessive carbon or soot in the burner / combustion chamber and flame tube as well as the inside of the heat exchanger is in most a symptom of an underlying problem which is the root cause. Therefore, it is very important to identify and correct the root cause so that the burner does not become restricted again. Please refer to the troubleshooting guide and fault code list to identify the problem. Also refer to the installation instructions to make sure the heater and accessories are installed according to the installation guidelines using the correct parts. 

In some cases the carbon build up in the burner may be too severe and the burner would need to be replaced. Unless the root cause of the carbon build up is corrected the replacement or cleaning of the burner will not result in a permanent solution but only a temporary fix.

ESPAR Heater TipRegardless of the season, run the heater every month for a minimum period of 15 minutes. This will help the heater burn away any combustion residue in the burner chamber, prevents corrosion in the waterjacket and decay of “O” rings. It also ensures that fuel in the lines to the heater does not gel and solidify and that the heater will start reliably when the heating season arrives.

Arctic Traveler Canada (ATC) is a Eberspaecher Master Stocking Distributor (MSD) and offers the complete range of Airtronic and Hydronic Heaters. For more Preventative Maintenance procedures, browse the Espar category of our blog ATCNEWS or call us at 1-800-295-4156 for more information.

How To Check and Remove Carbon Build up

Airtronic Heaters Preventative Maintenance

Hydronic Heaters Preventative Maintenance

ESPAR Heaters : How to check & remove Carbon build up

Preventative Maintenance for ESPAR Airtronic and Hydronic Heaters. How to determine and remove carbon build up in the burner.
How To Determine and Remove Excessive Carbon Build up in Espar Heaters.

One way to identify if the burner in your Espar Heaters may have excessive carbon build up is to look into the exhaust outlet of the heater with the flexible exhaust pipe removed.
This may be difficult while the heater is installed due to its location but with the assistance of a mirror and a flashlight it can be accomplished.
Intake and Exhaust outlets of the Espar heaters
Another way to find out if the burner has excessive carbon build up, is to inspect the glow pin screen chamber and look into the burner as much as possible.
If the bottom of the glow pin screen chamber is blocked or partially restricted it may be an indication that the burner could have carbon build up.
Glow pin chamber in Espar Heaters.
When Espar heaters have failed to start due to excessive carbon build‐up in the burner, the heater may produce a Fault Code 52 which is Safety Time Exceeded.
This indicates that the heater was not able to start within its allowed start up time. This may also be accompanied by excessive white smoke.

CAUTION:
During the cleaning process of the heater it is likely that hot pieces of carbon will come out of the exhaust pipe of the heater. Make sure that there is nothing on or around the exhaust that could be ignited by these particles. For example, oily rags, fuel spills, the kerosene container or any other flammable material or substance.
Do not look into exhaust pipe or expose unprotected part of your body to the exhaust outlet.

It is the responsibility of the technician who is performing this method of carbon removal to ensure all safety regulations for working with fuel, are met during the procedure. 
Below is a picture of a burner that was cleaned using Kerosene.
Pictures of the burner in your Espar Heaters before and after it was cleaned to optimize performance and extend life span.


Alternate method of cleaning Espar Heaters

  • Remove the glow pin using the glow pin removal tool, Espar part number 25 2069 01 03 03 and replace the glow pin screen, Espar part number 25 2069 01 03 00. Make sure the ventilation hole on the side of glow pin chamber is completely clear and not restricted or plugged. Clean the glow pin screen chamber with a brush before inserting the new glow pin screen.
  • Reassemble the heater back to operating condition.
  • Make sure all sources of ignition are kept a safe distance away from the fuel lines and the container of kerosene.
  • Remove fuel line from inlet side of fuel pump.
  • Replace this fuel line with another section of fuel line which is an appropriate length and secure one end to inlet side of fuel pump and other end into a flammable safe container of Kerosene. Espar plastic fuel tank or another approved container may be used.
  • Make sure that the fuel lines and fuel container are not near any sources of heat. Make sure the fuel lines do not touch the exhaust systems of the vehicle, or the Heater.
  • Ensure end of fuel line is securely fastened to fuel pump as to not allow any air to enter fuel system during operation.
  • Ensure Kerosene container is not placed near the air intake or exhaust of heater; this will prevent any fumes to enter combustion chamber and also prevent any sparks or hot particles from igniting the Kerosene.
  • Turn on the heater. This may take several attempts to prime fuel lines.
  • Adjust Thermostat or Mini Controller to the highest temperature set point. If necessary, open vehicle doors allowing cool air in. This will ensure that the heater runs in boost.
  • Some heaters with excessive carbon build up may not start using kerosene and will give a Fault Code 52: Safety Time Exceeded. These heaters may require that they be disassembled and cleaned manually.
  • Allow heater to run in boost for approximately 25‐30 minutes.
  • Turn heater off
  • After the heater has completed its cool down cycle, the fuel line can be removed from fuel pump and container. Container can be removed from the area and safely stored away.
  • Reinstall original fuel line back to inlet side of fuel pump.
  • The heater can now be operated as usual.


ESPAR Heater Tip
Regardless of the season, run the heater every month for a minimum period of 15 minutes. This will help the heater burn away any combustion residue in the burner chamber, prevents corrosion in the waterjacket and decay of “O” rings. It also ensures that fuel in the lines to the heater does not gel and solidify and that the heater will start reliably when the heating season arrives.

Arctic Traveler Canada is a MSD (Master Stocking Distributor) for Eberspaecher products and a technical leader actively involved in projects driving the mobility of tomorrow. Call ATC @ 1-800‐295‐4156 for all your Heater and AC needs.

Airtronic Heaters Preventative Maintenance
Hydronic Heaters Preventative Maintenance

Blower Motors by Make

Blower Motors and Wheels are integral parts in the delivery and circulation of air in your vehicles Air Conditioning system. An Electric DC motor is used to circulate warm and cool air inside the cabin and/or sleeper. The Blower Motor “blows” and circulates the warm air from the fins of the heater core or cools the air as it passes from the fins of the evaporator.
Without these components, the hot or cold air produced by your air conditioning system won’t circulate to reach your vehicle’s interior cabin and or sleeper. We offer solutions for Freightliner, International, Kenworth, Mack, Peterbilt, Sterling, Volvo and Western Star. Review the fast moving replacements by Brand below or the full listing of replacement Blowers here.

TECH TIP Video:  Blower Motors – Common Reasons For Failures

Blower Motors by Make - Freightliner, International, Kenworth, Navistar, Peterbilt, Sterling, Volvo - Arctic Traveler CanadaBlower Motors by Make - Freightliner, International, Kenworth, Navistar, Peterbilt, Sterling, Volvo - Arctic Traveler Canada

Arctic Traveler Canada is a proven and trusted specialist in mobile climate control. We design, engineer, manufacturer and distribute a wide range of HVAC solutions for Commercial and Industrial applications. We offer replacement OE and AM parts & supplies for All Applications and Any HVAC system. Call ATC today at 1-800-295-4156 to discuss what’s possible and let our experience be your guide.

Other informative links
Best Selling HVAC Parts By Brand
OEM and AM Replacement A/C Hoses

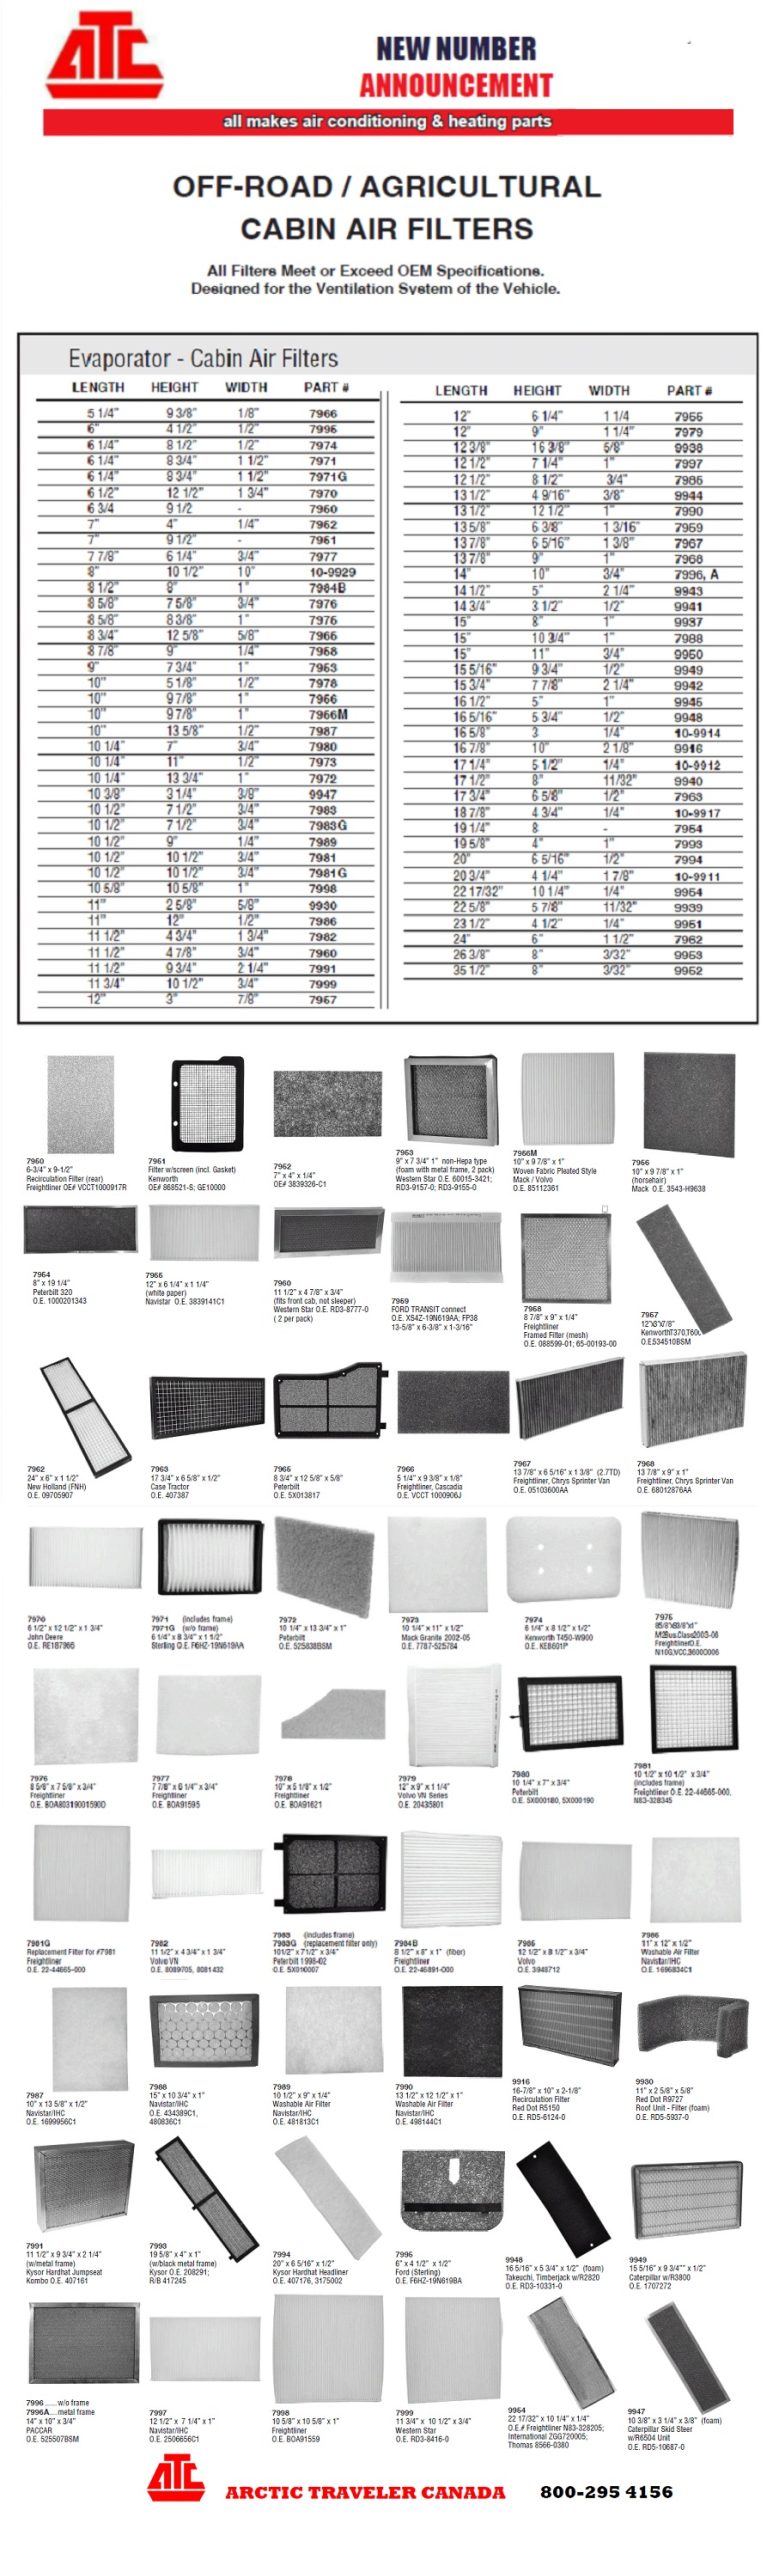
Cabin Air Filters

Cabin Air Filters – Increase A/C efficiency and Reduce dust, dirt and allergens

Replacing your cabin air filter is a relatively easy and inexpensive maintenance task that can significantly improve the air quality inside your vehicle. It’s generally recommended to replace it every 20-24,000Kms, or at least once a year, but you may need to replace it more often if you drive in dusty or polluted areas. Signs that your cabin air filter needs replacing include reduced airflow from vents, unpleasant odors, and increased allergy symptoms. 

A relatively new feature in the heavy duty industry, the cabin air filters are often overlooked in regular vehicle maintenance. That’s unfortunate because the cabin air filter is just as important to the passengers as the engine air filter is to the vehicle and a likely cause of “A/C Not Blowing Cold“. A cabin filter processes the air that enters the passenger compartment via the vehicle’s heating and air conditioning system, increasing passenger comfort by trapping particulates, pollen, and other irritants.

For people with allergies and other sensitivities to airborne agents, the cabin filter represents a significant advance. Replacing the cabin air filter at the recommended interval or sooner, especially in areas of high particulate, allows the A/C system to run at optimal efficiency and passengers to breathe cleaner, fresher air, which makes any journey more enjoyable.
Cabin Air Filters – Increase A/C efficiency and Reduce dust, dirt and allergens.