
Tag: Truck A/C and Heating Parts

Green Freight Program


The Green Freight Program funds fleet retrofits of a variety of products that help to reduce fuel consumption and greenhouse gas emissions.

The Green Freight Program was launched in Q4 2022 by the Government of Canada to help fleets reduce their fuel consumption and greenhouse gas emissions through fleet energy assessments, fleet retrofits, engine repowers, logistical best-practice implementation and the purchase of low carbon vehicles. It will be administered through two key funding streams. See below for details and Please note Stream 2 is Closed.

Green Freight Program (GFP) details

To take advantage of the program, applicants must first complete a fleet energy assessment through Natural Resources Canada (NRCan). NRCan offers up to 50% of the cost towards a third-party fleet energy assessment being completed. Applicants can also choose to conduct a self-assessment, following NRCan’s Assessment Guidelines. With a valid fleet assessment in hand, companies qualify to receive grants towards recommended fleet retrofit activities.

Program Offerings from  Omega Canada affiliates Arctic Traveler Canada, Hammond Air and Remco Air 

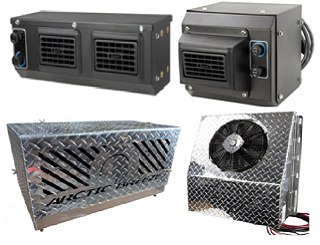
Arctic BREEZE No-Idle ACArctic BREEZE. The battery powered No Idle AC solution, lets you cool your cab without idling your engine and without running an APU.
Battery powered No Idle AC solutions like Arctic BREEZE, qualify for a 50% grant up to a max of $3,000 per device.

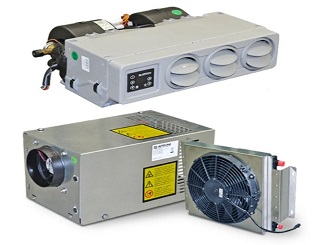
Autoclima Fresco 9000 No-Idle ACThe Autoclima Fresco 9000 is a battery-powered, zero-idle air conditioning system, that ensures drivers stay comfortable and rested.
Battery powered Idle free AC solutions like the Autoclima Fresco 9000, qualify for a 50% grant up to a max of $10,000 per device.

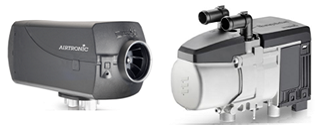
Eberspaecher Air & Water HeatersEberspaecher Air & Water Heaters heaters are independent of both the engine and of the vehicle’s HVAC system.

Eberspaecher Cab Heaters qualify for a 50% grant up to a max of $2,000 per device.

Eberspaecher Water Heaters qualify for a 50% grant up to a max of $1,500 per device.

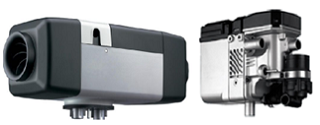
Webasto Air & Water HeatersWebasto Air & Water Heaters heaters are independent of both the engine and of the vehicle’s HVAC system.

Webasto Cab Heaters qualify for a 50% grant up to a max of $2,000 per device.

Webasto Water Heaters qualify for a 50% grant up to a max of $1,500 per device.

Funding Stream Status

Streams

Launch Date

Close Date

RFP Type

Status

Stream 1-
Assess and Retrofit

December 12, 2022

March 31, 2027

Continuous Intake

Open

Stream 1 – Assess and Retrofit

Providing grants towards Third-Party Fleet Energy Assessments and Truck/Trailer Equipment Retrofits.

For Fleet Energy Assessments, the program will provide up to 50% per company, to a maximum of $40,000.
For Truck/Trailer Equipment Retrofits, the program has established a list of eligible technologies and will provide up to 50% per device.
The maximum amount payable for eligible activities under Stream 1 is $250,000 per applicant.
Applicants will be reimbursed after submitting their invoices for eligible purchases.
Stream 1 was launched December 12, 2022. Funding now available. Apply through the new portal here!

To see the full list of eligible products click here –  What Components Qualify for the Green Freight grants  

Omega Canada is a Master Stocking Distributor of industry leading HVAC products and a proven and trusted specialist in mobile climate control. From replacement air conditioning and heating parts for heavy duty trucks and mobile equipment to Air Filtration, Cabin Pressurization & Refrigeration solutions, we are the source for all your HVAC needs.
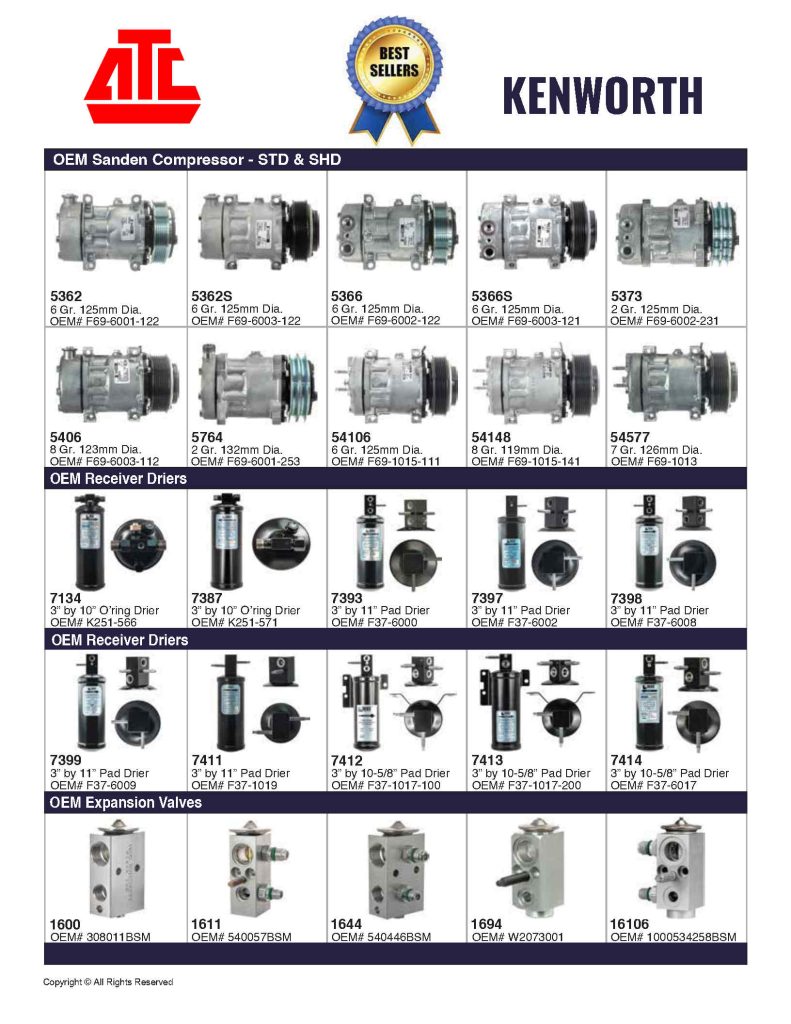
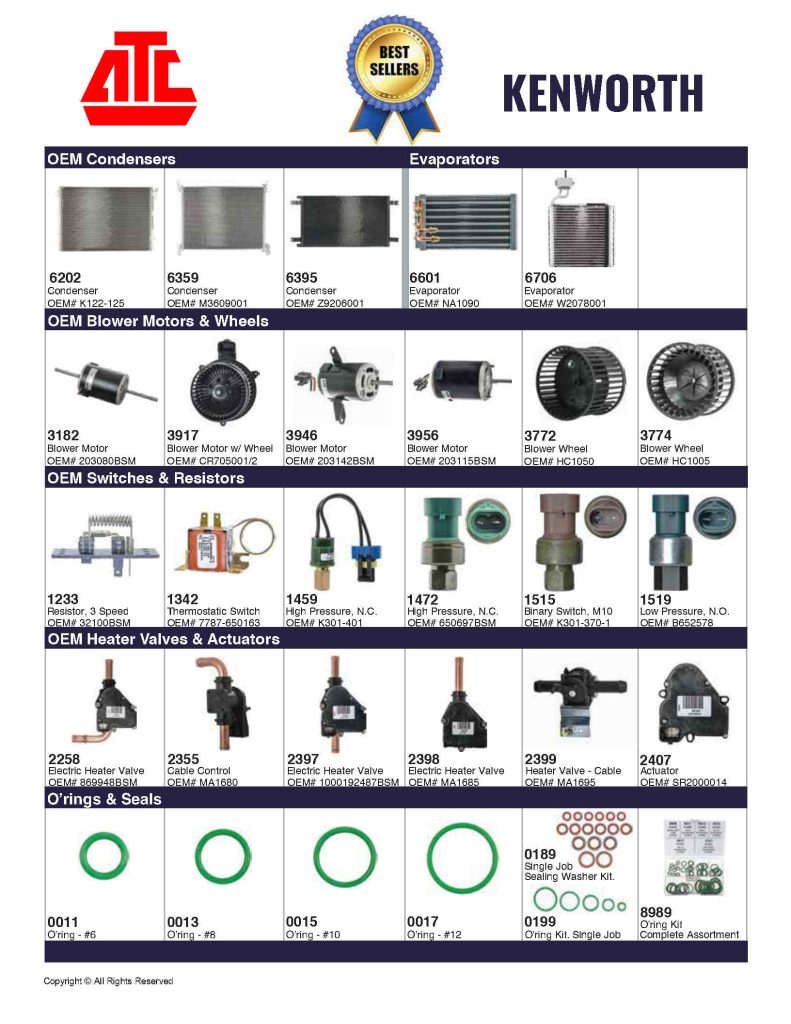
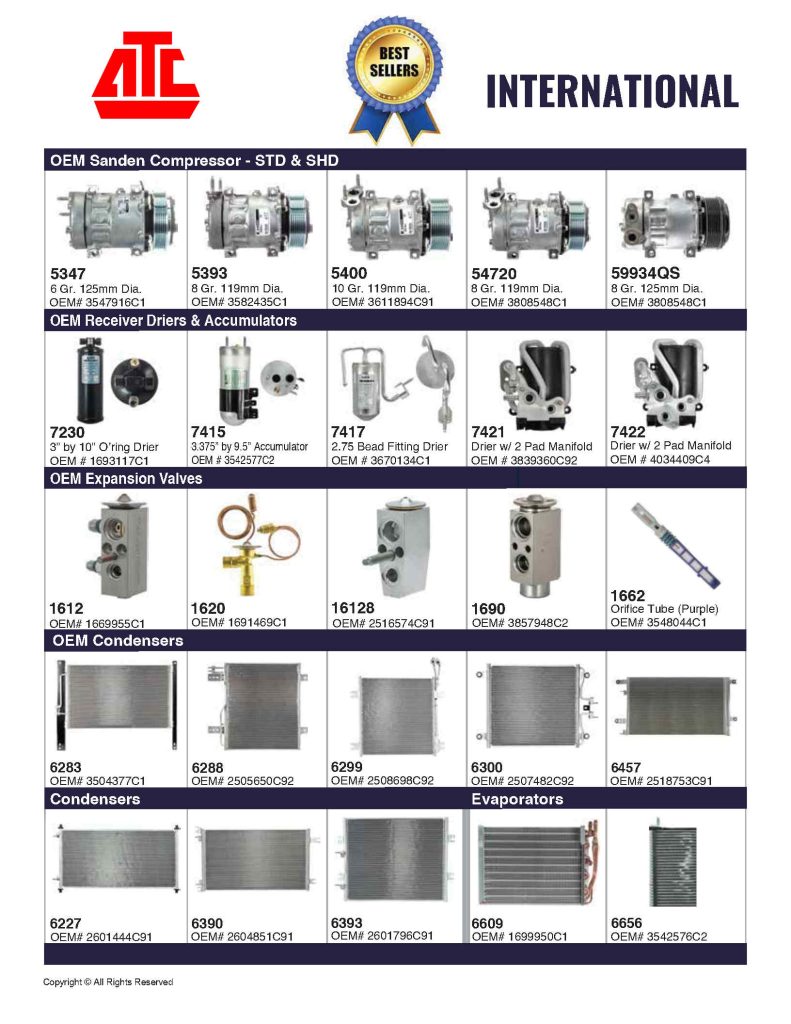
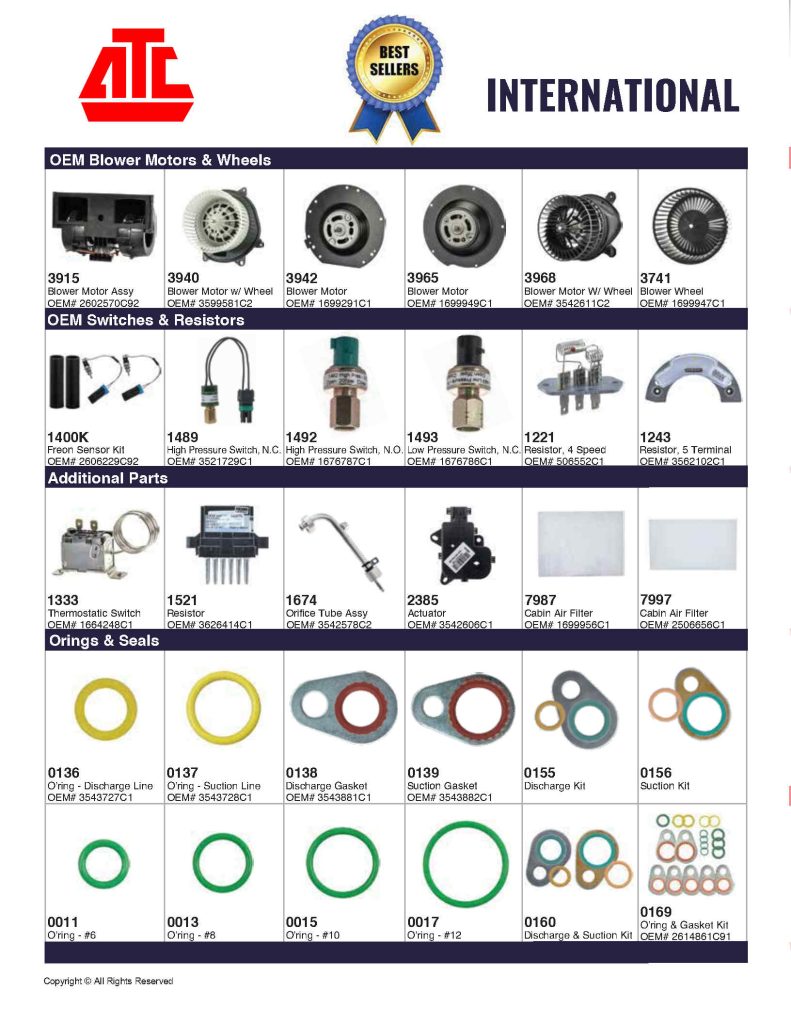
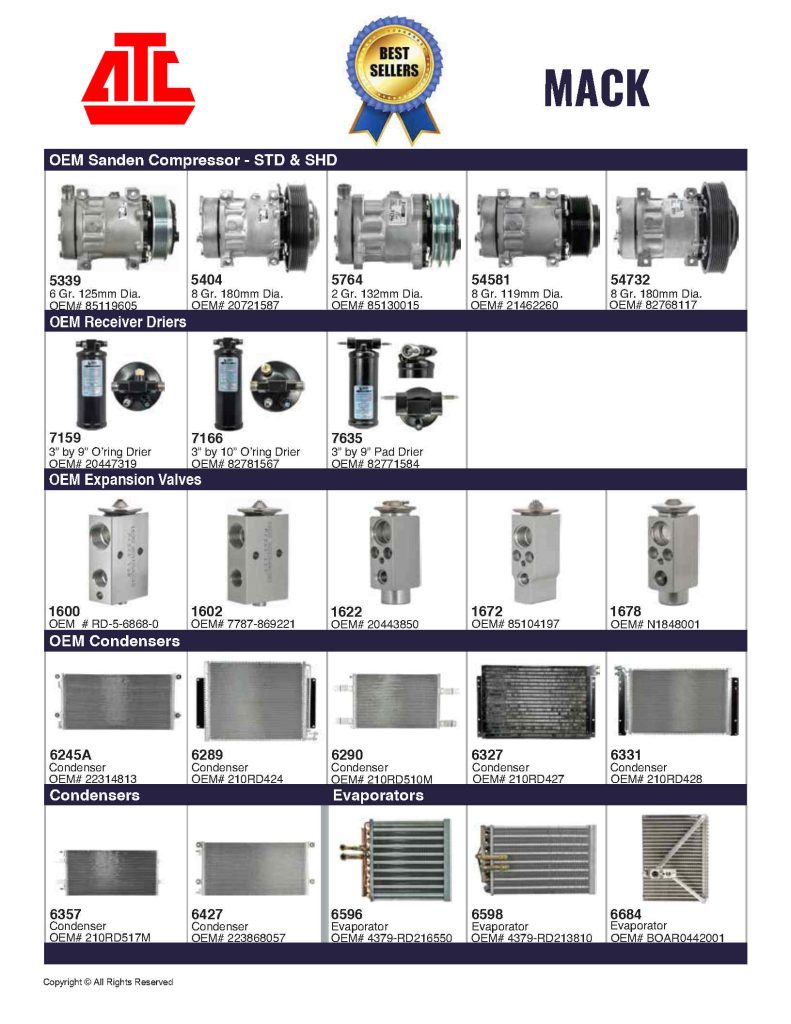
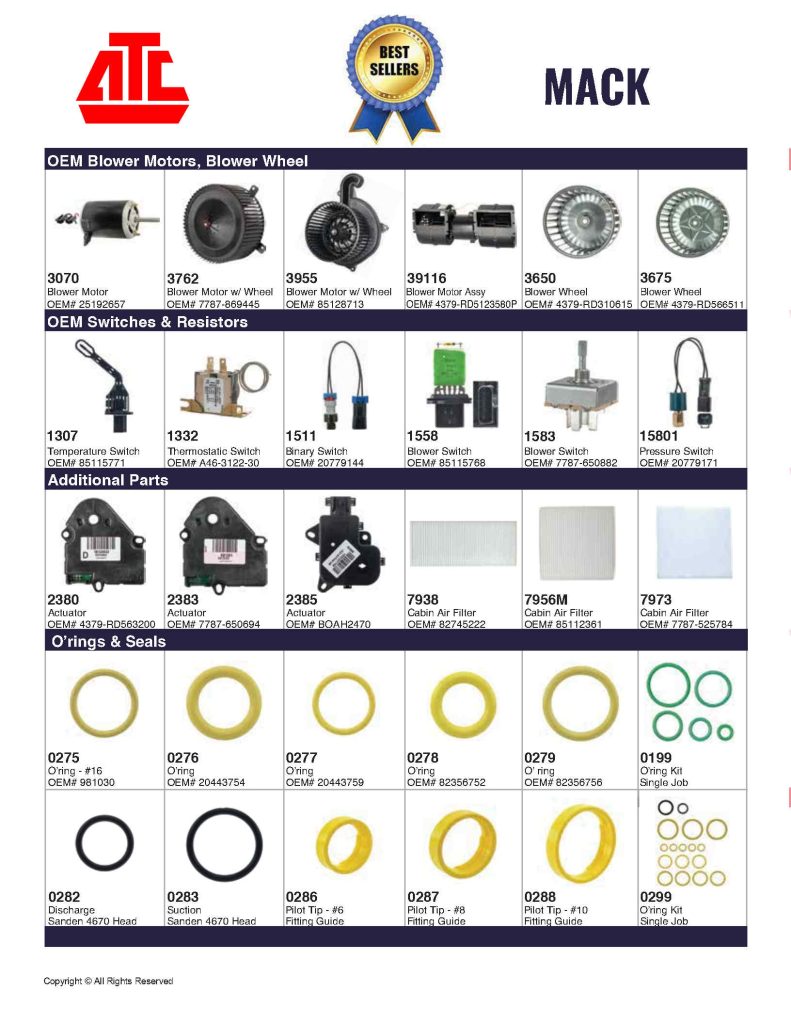
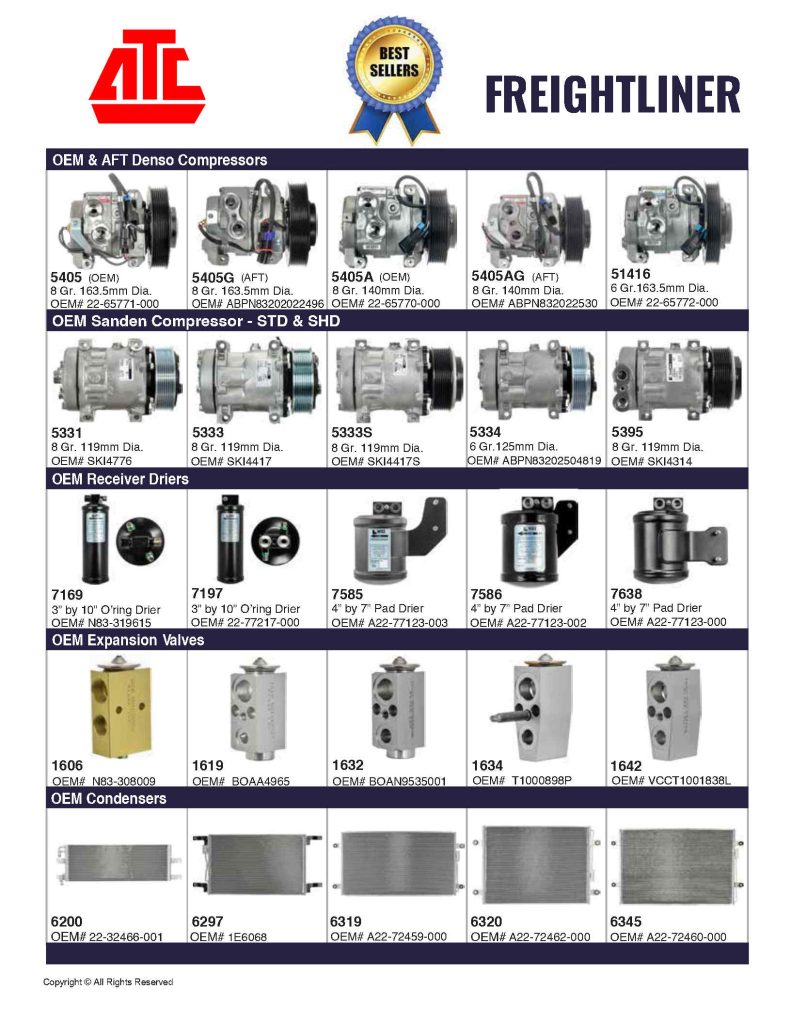
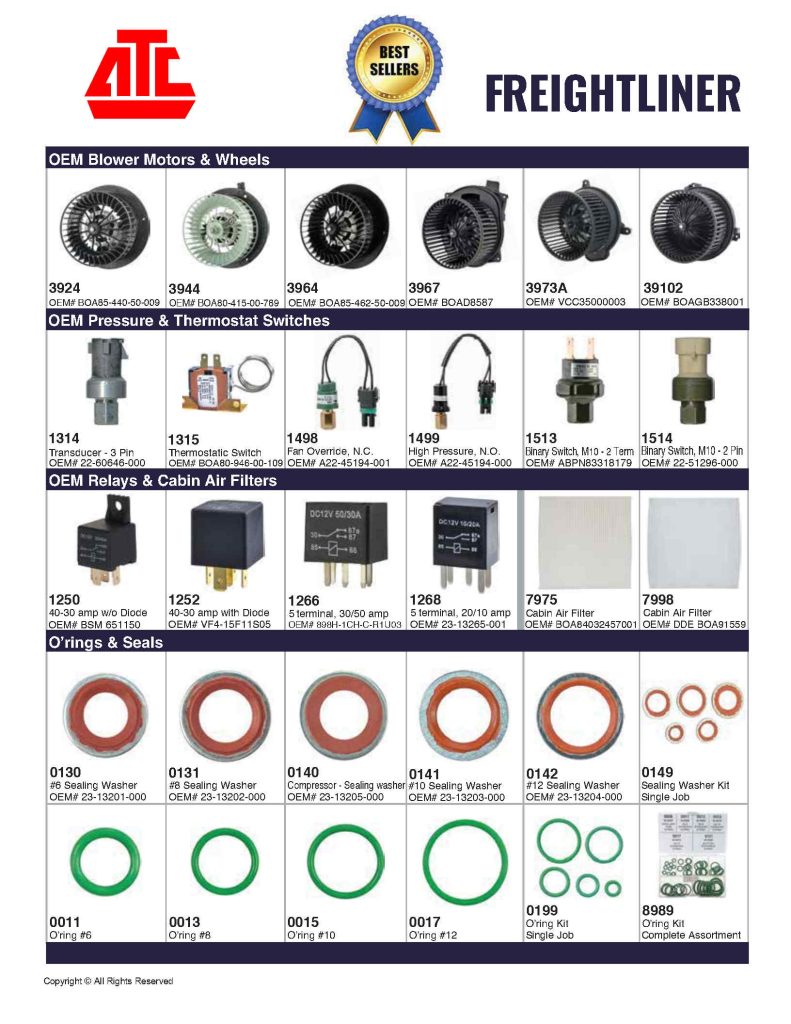
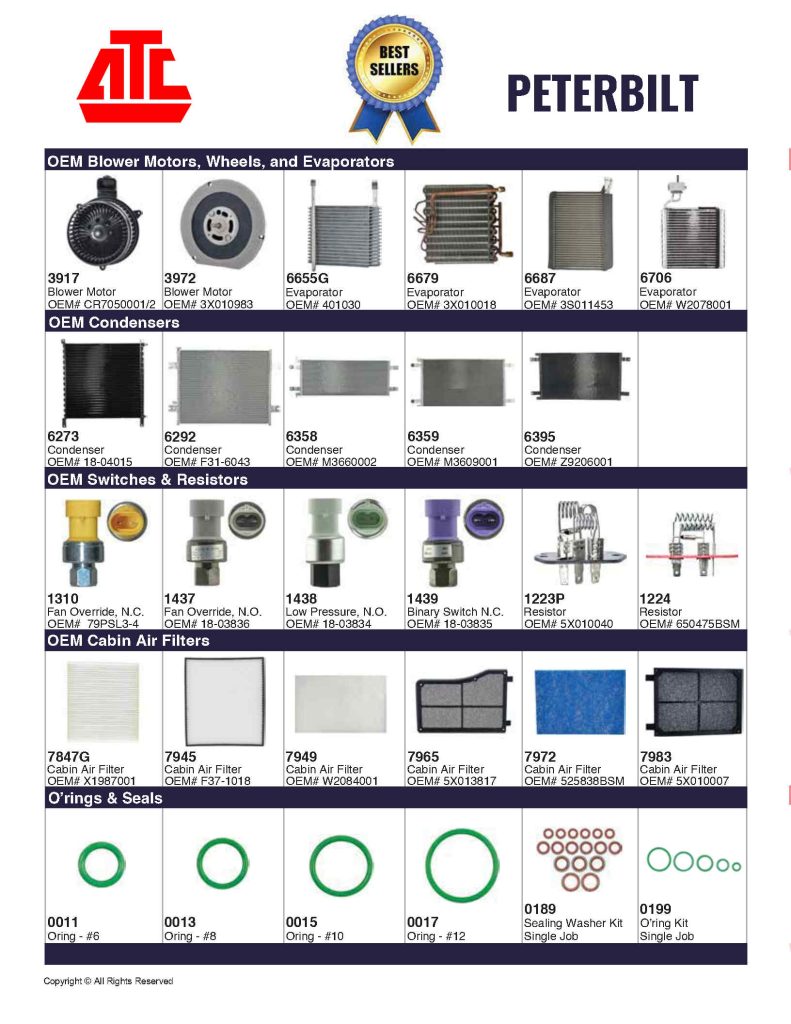
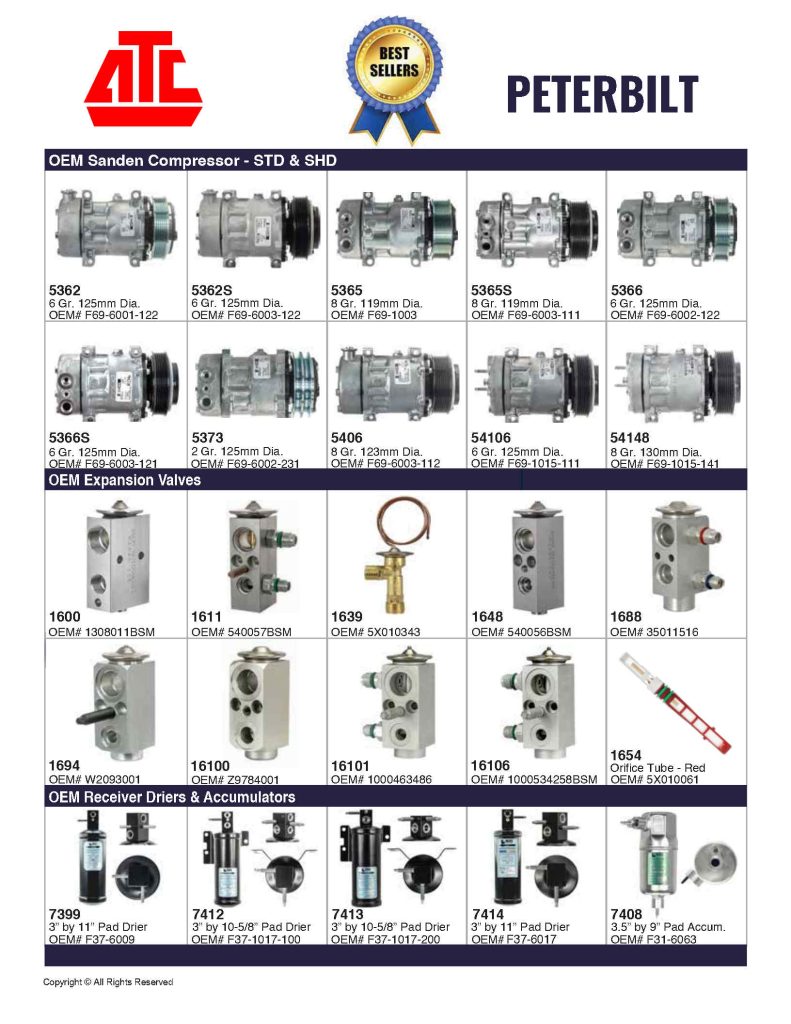
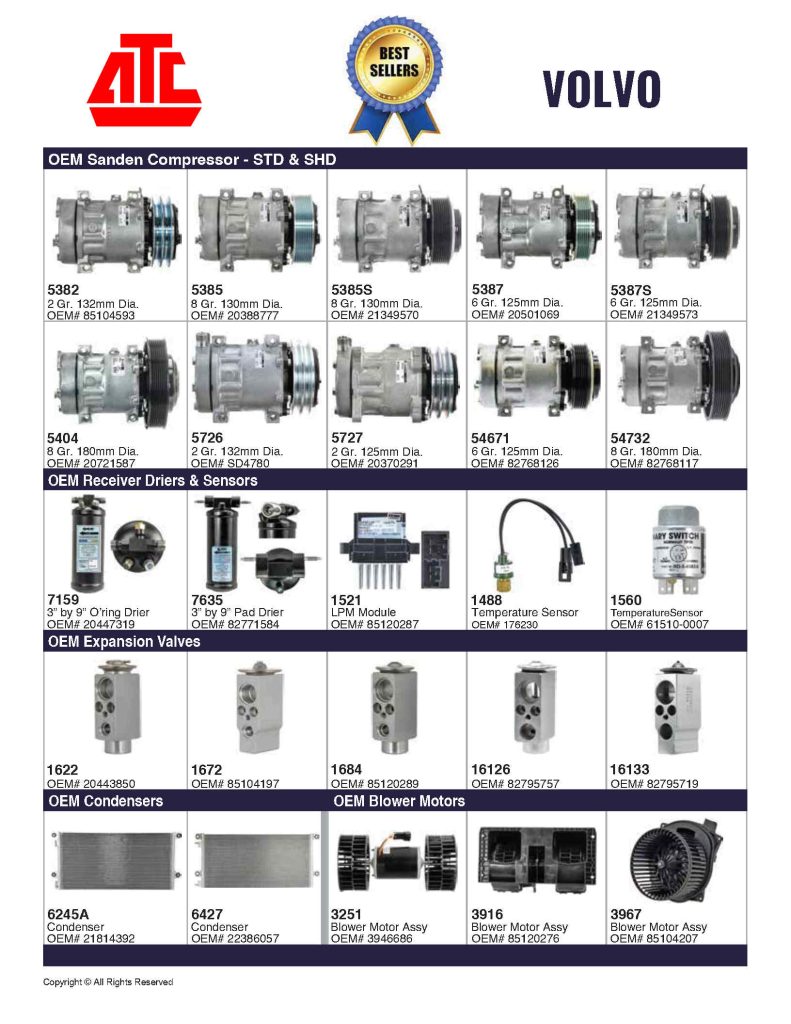
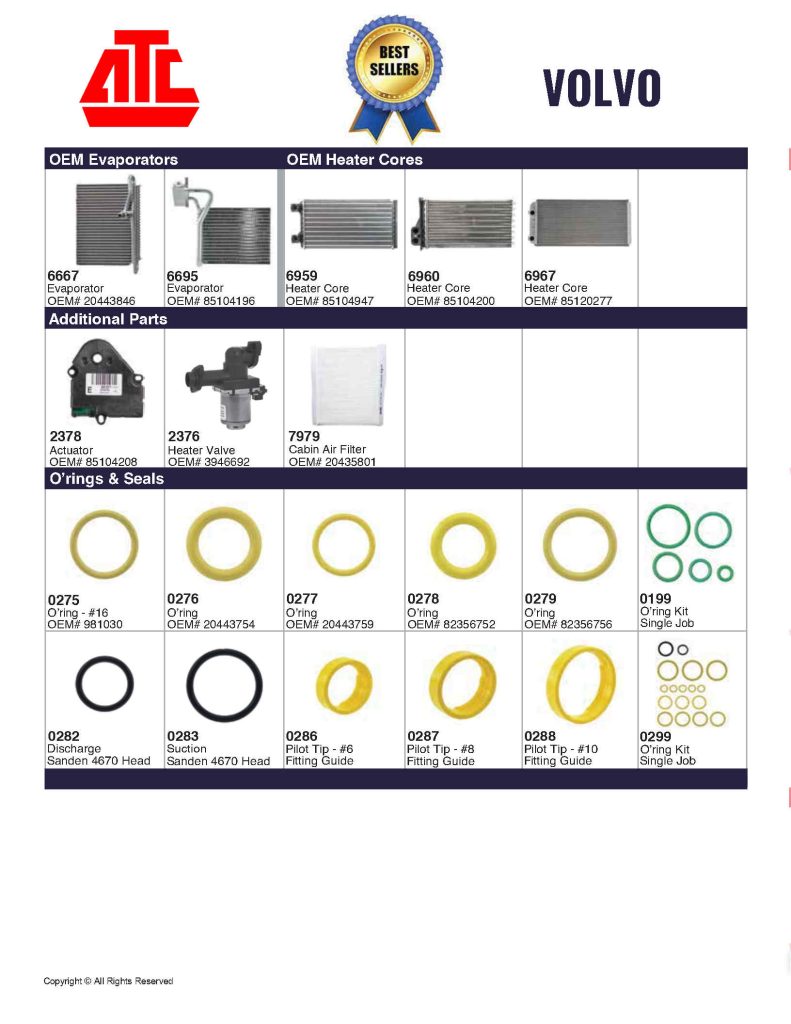
Best Selling Mobile HVAC parts by Make

Need HVAC parts for Freightliner, Kenworth, International, Peterbilt, Sterling, Volvo, Western Star and more!
Having the right part is paramount to getting the job done right and to help with your choice, we offer Best Selling Mobile HVAC parts by make featuring Denso, Sanden & York Compressors, Clutches, Condensers, Expansion Valves, Receiver Driers and so much more. 

We’re the source for all your HVAC products for Heavy Duty, Medium Duty, Off-Road, Agriculture and Buses.
We manufacture and distribute an extensive line of high-quality original equipment from industry-leading brands and aftermarket HD HVAC parts and supplies for Any Truck, Any HVAC System or Any HVAC Part.
Call 800-295-4156 for more details. 

Auxiliary Heater – Underseat High Performance

This underseat high performance auxiliary heater ( 082210000 ) is ideal for applications that require a small footprint (13.70 L x 9.21 H x 9.21 W ) but demand high performance.  With 42,000 BTU’s, it provides significant heating to ensure optimum operator comfort.

Auxiliary heaters are an additional heating component installed in vehicles to provide supplementary heat. It serves as a backup to the main heating system and allows the engine to warm up faster in cold weather. Heat is then transferred via coolant that circulates through the vehicle’s heating system. The heater may be activated manually or automatically when the engine coolant temperature drops below a set level.

Auxiliary heaters are common in diesel vehicles since diesel engines can take longer to warm up in cold temperatures. The extra heat provided by the auxiliary heater allows the passenger cabin to reach a comfortable temperature faster when first starting the vehicle. Some auxiliary heaters have electric fans to help distribute the hot air through the vehicle’s ventilation system. More advanced designs integrate with the climate control system for fully automated operation.

Overall, auxiliary heaters are an effective way to supplement the main heating system and provide fast warm up times in cold weather. With an auxiliary heater, drivers don’t have to wait as long for the engine to warm up before getting heat inside the cabin.

Compact Heater with 42,000 BTU’s provides significant heating to ensure optimum operator comfort.

#ArcticTravelerCanada is a Master Stocking Distributor and manufacturer of HD HVAC components and systems for On and Off-road equipment. We offer replacement parts & HVAC systems for all makes, any HVAC Part or System. We also engineer a variety of HVAC solutions for any application in any industry. Contact Us at 1-800-295-4156 for more information.

ESPAR Airtronic Heaters – Preventative Maintenance

Arctic Traveler Canada is a master distributor and technical service expert for ESPAR Airtronics and Hydronics Heaters.

Preventative Maintenance For Espar Airtronic Heaters

It’s recommended that Espar Airtronic heaters receive a pre-season check-up to ensure the heaters are ready for a trouble-free cold weather season. Always use the recommended tools and follow the procedures as outlined in the manual while removing and reinstalling the heater components. 

ESPAR Heater TipRegardless of the season, run the heater every month for a minimum period of 15 minutes. This will help the heater burn away any combustion residue in the burner chamber, prevents corrosion in the waterjacket and decay of “O” rings. It also ensures that fuel in the lines to the heater does not gel and solidify and that the heater will start reliably when the heating season arrives.

The heaters should be inspected and repaired by an Espar trained mechanic, as follows:
1. Before the initial operation, ensure that the heater is not being subjected to external loads by heavy objects being placed over it. This may cause damage to the heater parts and affect its normal operation. Ensure that sufficient clearances, as recommended in the heater manual, are being maintained around the heater, even while the vehicle is in operation.

2. Check the return air inlet port and the hot air outlet port for any blockages. Inspect the length of ducting for any damage and replace as necessary. Ensure all ducting connections are secure. Discourage heat sensitive materials from being placed too close to the heater, ducting components or hot air outlet ports.

3. Check all electrical connections from the heater to the batteries. Check for wear and abrasion along the length of the harnesses. Repair or replace the harness whenever the harness insulation is broken or damaged. Check the battery connections. Clean any corrosion at the terminals. Replace the battery terminals if the corrosion is severe. Check the fuse for corrosion and the correct rating.

4. Remove the glow pin and, if necessary, clean it. If the glow pin shows signs of dissimilar colour or distortions, replace it. Inspect the glow pin wires for damage and if necessary, replace it. Remember to clean the glow pin chamber and ensure the glow pin ventilation hole is clear of any obstructions, then replace the glow pin.

5. Regardless of its condition, remove and replace the glow pin screen every pre-season. Make sure that the new screen is installed correctly. Install the new screen.

6. Check the condition of the exhaust pipe. Look for any holes or breaks in the exhaust piping. Replace if necessary. Ensure the exhaust pipe is securely located and correctly routed.

7. Check the condition of the combustion air intake tube. Clear any blockages. If damaged, replace it. Ensure that the combustion air intake tube is securely located and correctly routed.

8. Ensure the mounting angle of the fuel pump is in between 15-35 degrees. An incorrectly mounted fuel pump may lead to excessive carbon issues. Check the fuel lines for possible leaks, loosened clamps, etc., inspect the filter on the suction side fuel pump filter, clean or replace it as necessary. Once the entire fuel system has been checked and any issues corrected, it is advisable to do a fuel quantity check.

9. If the fuel quantity result is above specification, then it will be a cause for excessive carbon issues and the fuel pump would need to be replaced. If the fuel quantity result is within specifications, but on the higher side, then any possible excessive carbon issues may be corrected by increasing the mounting angle of the fuel pump to the near vertical position. If the fuel quantity result is below specification, then it is recommended that the fuel pump be replaced, but only if the heater repeatedly flames out during operation.

10. If there are complaints about the heater smoking excessively during operation, then remove and check the condition of the burner. The burner should be light brown in colour. Clean any carbon buildup inside the burner tube. Check the inside of the heat exchanger and scrape out any loose carbon.

11. When reassembling the burner and the heat exchanger, use a new thermal insulator. Likewise, when reassembling the blower motor assembly use a new blower gasket.

12. Reassemble the heater and test operation. The heater should be bench tested for 15-20 minutes before returning the heater to the vehicle.

Preventative Maintenance procedures – see below to ensure all your Eberspaecher heaters perform as expected.
Hydronic Heaters Preventative Maintenance

Carbon Build up – How to check and remove

Arctic Traveler Canada is an MSD (Master Distributor) for Eberspaecher productsand a technical leader actively involved in projects driving the mobility of tomorrow. Call 1-800-295-4156 for more information about mobile heating solutions.

ESPAR Hydronic Heaters – Preventative Maintenance

Espar’s Hydronic Heaters uses the vehicles coolant system to pre-heat the engine coolant to allow for effective vehicle starting in extreme climates. With some modifications, vehicles can be configured to allow for warming the passenger compartment through the existing vehicle heating system.

Espar Hydronic heaters are integrated into the cooling system of the engine and work independently of the engine, thus offers pre-heating of the engine and the vehicle’s passenger compartment. The thermal energy gained is then distributed through the vehicle’s own heat exchanger as forced hot air which heats the interior of the vehicle via existing air vents. The engine is warmed up with the residual heat in the cooling water.

ESPAR Heater TipRegardless of the season, run the heater every month for a minimum period of 15 minutes. This will help the heater burn away any combustion residue in the burner chamber, prevents corrosion in the waterjacket and decay of “O” rings. It also ensures that fuel in the lines to the heater does not gel and solidify and that the heater will start reliably when the heating season arrives.

Pre-Season Preventative Maintenance For Hydronic Heaters 

Before the cold weather arrives, it’s recommended that your Espar HYDRONIC  heaters receive a preseason check to ensure the heater is clean, free running and ready for a trouble-free season. Please use the recommended tools and follow the procedures as outlined in the heater manual while removing and reinstalling the different heater components.The heaters should be inspected and repaired by an Espar trained Technician, as follows: 

1. Check all electrical connections from the heater to the batteries. Check for wear and abrasion along the length of the harnesses. Repair or replace the harness whenever the harness insulation is broken or damaged. Check the battery connections. Clean any corrosion at the terminals. Replace the battery terminals if the corrosion is severe. Check the fuse for corrosion and the correct rating.

2. Check all clamps and hoses. Replace as required.

3. Check the condition of the exhaust system. Check for holes and breaks in the exhaust piping. Replace the exhaust as necessary.

4. Check the fuel pump filter ‐ clean or replace it as necessary. For heaters with external fuel pumps, ensure that the mounting angle of the fuel pump is in between 15‐35o. An incorrectly mounted fuel pump may lead to excessive carbon issues. Check the fuel lines for possible leaks, loose clamps, etc. Once the entire fuel system has been checked and issues, if any, are corrected, it is advisable to do a fuel quantity check.

5. Check and clear clogged weep holes on the side of the heater body. Look for any indication of coolant leakages. If leakage is suspected then remove the cover with water pump assembly and inspect and replace “O” rings on the water pump housing. Closely inspect the heater waterjacket for leakages and replace the “O” ring between waterjacket and heat exchanger. If the waterjacket is cracked, replace it.

6. Remove and replace the glow pin screen. Make sure that the new screen is installed correctly as outlined in the repair manual for the heater.

7. Remove and check the glow pin. If it shows signs of dissimilar colour or if the glow pin is in any way distorted, replace it.

8. The coolant pump should be removed and the impeller checked for damage. Any dirt or metal particles on the impeller magnet should be removed and the cavity in the pump should also be cleaned. Please Note: coolant pumps are not covered by warranty if the vehicle’s coolant system is excessively contaminated. Refer to Technical Circular 250.

9. Remove the flame tube and check the condition of the flame tube end. The flame tube should be light brown in colour with no excessive carbon at the end of the flame tube. Check for carbon build up on the burner “nose” at the cold end of the flame tube. Any carbon covering the air slots should be removed. Check the inside of the heat exchanger and scrape any loose carbon out from between the fins in the heat exchanger. Re‐install the flame tube replacing all gaskets.

10. Re‐assemble the heater and test operation. The heater should be bench tested for 15‐20 minutes before returning it to the vehicle.

Preventative Maintenance procedures – see below to ensure all your Eberspaecher heaters perform as expected.
Airtronic Heaters Preventative Maintenance
Carbon Build up – How to check and remove

Arctic Traveler Canada is an MSD (Master Distributor) for Eberspaecher productsand a technical leader actively involved in projects driving the mobility of tomorrow. Call 1-800-295-4156 for more information about mobile heating solutions.

Carbon buildup. Remove it to increase heater performance

Arctic Traveler Canada is a master distributor and technical service expert for Eberspaecher Airtronic and Hydronic Heaters.

Carbon buildup can decrease heater performance and reduce operator comfort.

In the event that the burner / flame tube and combustion chamber of the Airtronic D2 or D4 becomes restricted and the heater fails due to carbon/soot build up it may be possible to clean the burner without disassembling the heater by running the heater in high using Kerosene instead of Diesel.

To help identify when a burner has excessive carbon build up, Click here and follow the recommendations.

Since the replacement of a burner with carbon build up is not covered by warranty unless the carbon was caused by a defective heater or component this bulletin will assist in reducing the cost and time of cleaning a burner that has caused the heater to fail due to excessive carbon build up.

The excessive build‐up of carbon in the heater is not a result of normal operation of the heater. The build‐up of excessive carbon or soot in the burner / combustion chamber and flame tube as well as the inside of the heat exchanger is in most a symptom of an underlying problem which is the root cause. Therefore, it is very important to identify and correct the root cause so that the burner does not become restricted again. Please refer to the troubleshooting guide and fault code list to identify the problem. Also refer to the installation instructions to make sure the heater and accessories are installed according to the installation guidelines using the correct parts. 

In some cases the carbon build up in the burner may be too severe and the burner would need to be replaced. Unless the root cause of the carbon build up is corrected the replacement or cleaning of the burner will not result in a permanent solution but only a temporary fix.

ESPAR Heater TipRegardless of the season, run the heater every month for a minimum period of 15 minutes. This will help the heater burn away any combustion residue in the burner chamber, prevents corrosion in the waterjacket and decay of “O” rings. It also ensures that fuel in the lines to the heater does not gel and solidify and that the heater will start reliably when the heating season arrives.

Arctic Traveler Canada (ATC) is a Eberspaecher Master Stocking Distributor (MSD) and offers the complete range of Airtronic and Hydronic Heaters. For more Preventative Maintenance procedures, browse the Espar category of our blog ATCNEWS or call us at 1-800-295-4156 for more information.

How To Check and Remove Carbon Build up

Airtronic Heaters Preventative Maintenance

Hydronic Heaters Preventative Maintenance

ESPAR Heaters : How to check & remove Carbon build up

Preventative Maintenance for ESPAR Airtronic and Hydronic Heaters. How to determine and remove carbon build up in the burner.
How To Determine and Remove Excessive Carbon Build up in Espar Heaters.

One way to identify if the burner in your Espar Heaters may have excessive carbon build up is to look into the exhaust outlet of the heater with the flexible exhaust pipe removed.
This may be difficult while the heater is installed due to its location but with the assistance of a mirror and a flashlight it can be accomplished.
Intake and Exhaust outlets of the Espar heaters
Another way to find out if the burner has excessive carbon build up, is to inspect the glow pin screen chamber and look into the burner as much as possible.
If the bottom of the glow pin screen chamber is blocked or partially restricted it may be an indication that the burner could have carbon build up.
Glow pin chamber in Espar Heaters.
When Espar heaters have failed to start due to excessive carbon build‐up in the burner, the heater may produce a Fault Code 52 which is Safety Time Exceeded.
This indicates that the heater was not able to start within its allowed start up time. This may also be accompanied by excessive white smoke.

CAUTION:
During the cleaning process of the heater it is likely that hot pieces of carbon will come out of the exhaust pipe of the heater. Make sure that there is nothing on or around the exhaust that could be ignited by these particles. For example, oily rags, fuel spills, the kerosene container or any other flammable material or substance.
Do not look into exhaust pipe or expose unprotected part of your body to the exhaust outlet.

It is the responsibility of the technician who is performing this method of carbon removal to ensure all safety regulations for working with fuel, are met during the procedure. 
Below is a picture of a burner that was cleaned using Kerosene.
Pictures of the burner in your Espar Heaters before and after it was cleaned to optimize performance and extend life span.


Alternate method of cleaning Espar Heaters

  • Remove the glow pin using the glow pin removal tool, Espar part number 25 2069 01 03 03 and replace the glow pin screen, Espar part number 25 2069 01 03 00. Make sure the ventilation hole on the side of glow pin chamber is completely clear and not restricted or plugged. Clean the glow pin screen chamber with a brush before inserting the new glow pin screen.
  • Reassemble the heater back to operating condition.
  • Make sure all sources of ignition are kept a safe distance away from the fuel lines and the container of kerosene.
  • Remove fuel line from inlet side of fuel pump.
  • Replace this fuel line with another section of fuel line which is an appropriate length and secure one end to inlet side of fuel pump and other end into a flammable safe container of Kerosene. Espar plastic fuel tank or another approved container may be used.
  • Make sure that the fuel lines and fuel container are not near any sources of heat. Make sure the fuel lines do not touch the exhaust systems of the vehicle, or the Heater.
  • Ensure end of fuel line is securely fastened to fuel pump as to not allow any air to enter fuel system during operation.
  • Ensure Kerosene container is not placed near the air intake or exhaust of heater; this will prevent any fumes to enter combustion chamber and also prevent any sparks or hot particles from igniting the Kerosene.
  • Turn on the heater. This may take several attempts to prime fuel lines.
  • Adjust Thermostat or Mini Controller to the highest temperature set point. If necessary, open vehicle doors allowing cool air in. This will ensure that the heater runs in boost.
  • Some heaters with excessive carbon build up may not start using kerosene and will give a Fault Code 52: Safety Time Exceeded. These heaters may require that they be disassembled and cleaned manually.
  • Allow heater to run in boost for approximately 25‐30 minutes.
  • Turn heater off
  • After the heater has completed its cool down cycle, the fuel line can be removed from fuel pump and container. Container can be removed from the area and safely stored away.
  • Reinstall original fuel line back to inlet side of fuel pump.
  • The heater can now be operated as usual.


ESPAR Heater Tip
Regardless of the season, run the heater every month for a minimum period of 15 minutes. This will help the heater burn away any combustion residue in the burner chamber, prevents corrosion in the waterjacket and decay of “O” rings. It also ensures that fuel in the lines to the heater does not gel and solidify and that the heater will start reliably when the heating season arrives.

Arctic Traveler Canada is a MSD (Master Stocking Distributor) for Eberspaecher products and a technical leader actively involved in projects driving the mobility of tomorrow. Call ATC @ 1-800‐295‐4156 for all your Heater and AC needs.

Airtronic Heaters Preventative Maintenance
Hydronic Heaters Preventative Maintenance

Air Filtration & Pressurization

Air filtration and pressurization are key components of HVAC systems that help maintain indoor air quality by removing airborne contaminants using filters. Pressurization helps control the direction of airflow and prevent infiltration of outdoor pollutants.

We offer two different Air Filtration & Pressurization Solutions. Both systems continually supply fresh filtered air into the cab creating a positive pressure inside a properly sealed cab. This over-pressure pushes clean air out leaks in the positive pressure side of the system, rather than allowing contaminated air to enter. The indoor air quality is critical to providing a healthy and productive work environment and whether it’s agriculture, construction, mining or waste management, operators spend a great deal of time in the cab of their equipment.

Cab pressurizers are highly effective at removing particulate as well as vapors and fumes. The filter element can also be customized to target specific contaminates present where your equipment is working. A differential pressure gauge or electronic pressure control system are available to measure the difference in pressure between the inside and outside of the cab.

Cab Filtration Solutions

The system incorporates Enginaire’s proven air pre-cleaner, with a patented in-line filter to make a highly efficient pressurizer that ensures clean filtered air. The unit combines a pre-cleaner with our proven VLR air filter system to give you a very efficient self contained filter air pump. As air is drawn into the air conditioner, the components remove large dirt particles with the built in centrifugal pre-cleaner.

The air is then filtered and blown into the air conditioner intake duct with our self contained air pump. By having a positive pressure on the incoming air chamber, the air conditioner can do it’s job easier with less power required. Even when the air conditioner is not being used, the clean air from the ECP is blown into the cab creating a positive pressure. This prevents dirt from entering the cab through leaks in it’s doors and other spaces.

Mining operations using dual Enginaire’s precleaners and ATC’s Air Filtration 200 solution (896068)

Mining operations using dual pre-cleaners and our Air Filtration 100 solution (896068)

Tow motor fleet utilizing ATC's Air Filtration 60 solution (896052) to provide a pressurized cabin and clean air for operators.

Tow motor fleet with Air Filtration 60 solution (896052) to pressurize the cabin and clean the air for operators.


Enginaire’s Cabaire™ uses it’s own high pressure air pump not a fan to deliver a high volume of dual filtered air into your enclosure which then has a positive air pressure on the inside. When the enclosure has a positive pressure, dirt is forced out of the doors, windows, and other unsealed areas instead of being drawn into the enclosure. You stay clean, your electronics and other instruments stay clean, while you “breathe easy”.

So whether you’re looking for a solution for smaller applications like Tow motors, Agriculture or gigantic machinery in Mining operations, Arctic Traveler Canada has a solution for your application. Call or visit us today for more information and see what 60 years of excellence can do for you.

Blower Motors by Make

Blower Motors and Wheels are integral parts in the delivery and circulation of air in your vehicles Air Conditioning system. An Electric DC motor is used to circulate warm and cool air inside the cabin and/or sleeper. The Blower Motor “blows” and circulates the warm air from the fins of the heater core or cools the air as it passes from the fins of the evaporator.
Without these components, the hot or cold air produced by your air conditioning system won’t circulate to reach your vehicle’s interior cabin and or sleeper. We offer solutions for Freightliner, International, Kenworth, Mack, Peterbilt, Sterling, Volvo and Western Star. Review the fast moving replacements by Brand below or the full listing of replacement Blowers here.

TECH TIP Video:  Blower Motors – Common Reasons For Failures

Blower Motors by Make - Freightliner, International, Kenworth, Navistar, Peterbilt, Sterling, Volvo - Arctic Traveler CanadaBlower Motors by Make - Freightliner, International, Kenworth, Navistar, Peterbilt, Sterling, Volvo - Arctic Traveler Canada

Arctic Traveler Canada is a proven and trusted specialist in mobile climate control. We design, engineer, manufacturer and distribute a wide range of HVAC solutions for Commercial and Industrial applications. We offer replacement OE and AM parts & supplies for All Applications and Any HVAC system. Call ATC today at 1-800-295-4156 to discuss what’s possible and let our experience be your guide.

Other informative links
Best Selling HVAC Parts By Brand
OEM and AM Replacement A/C Hoses

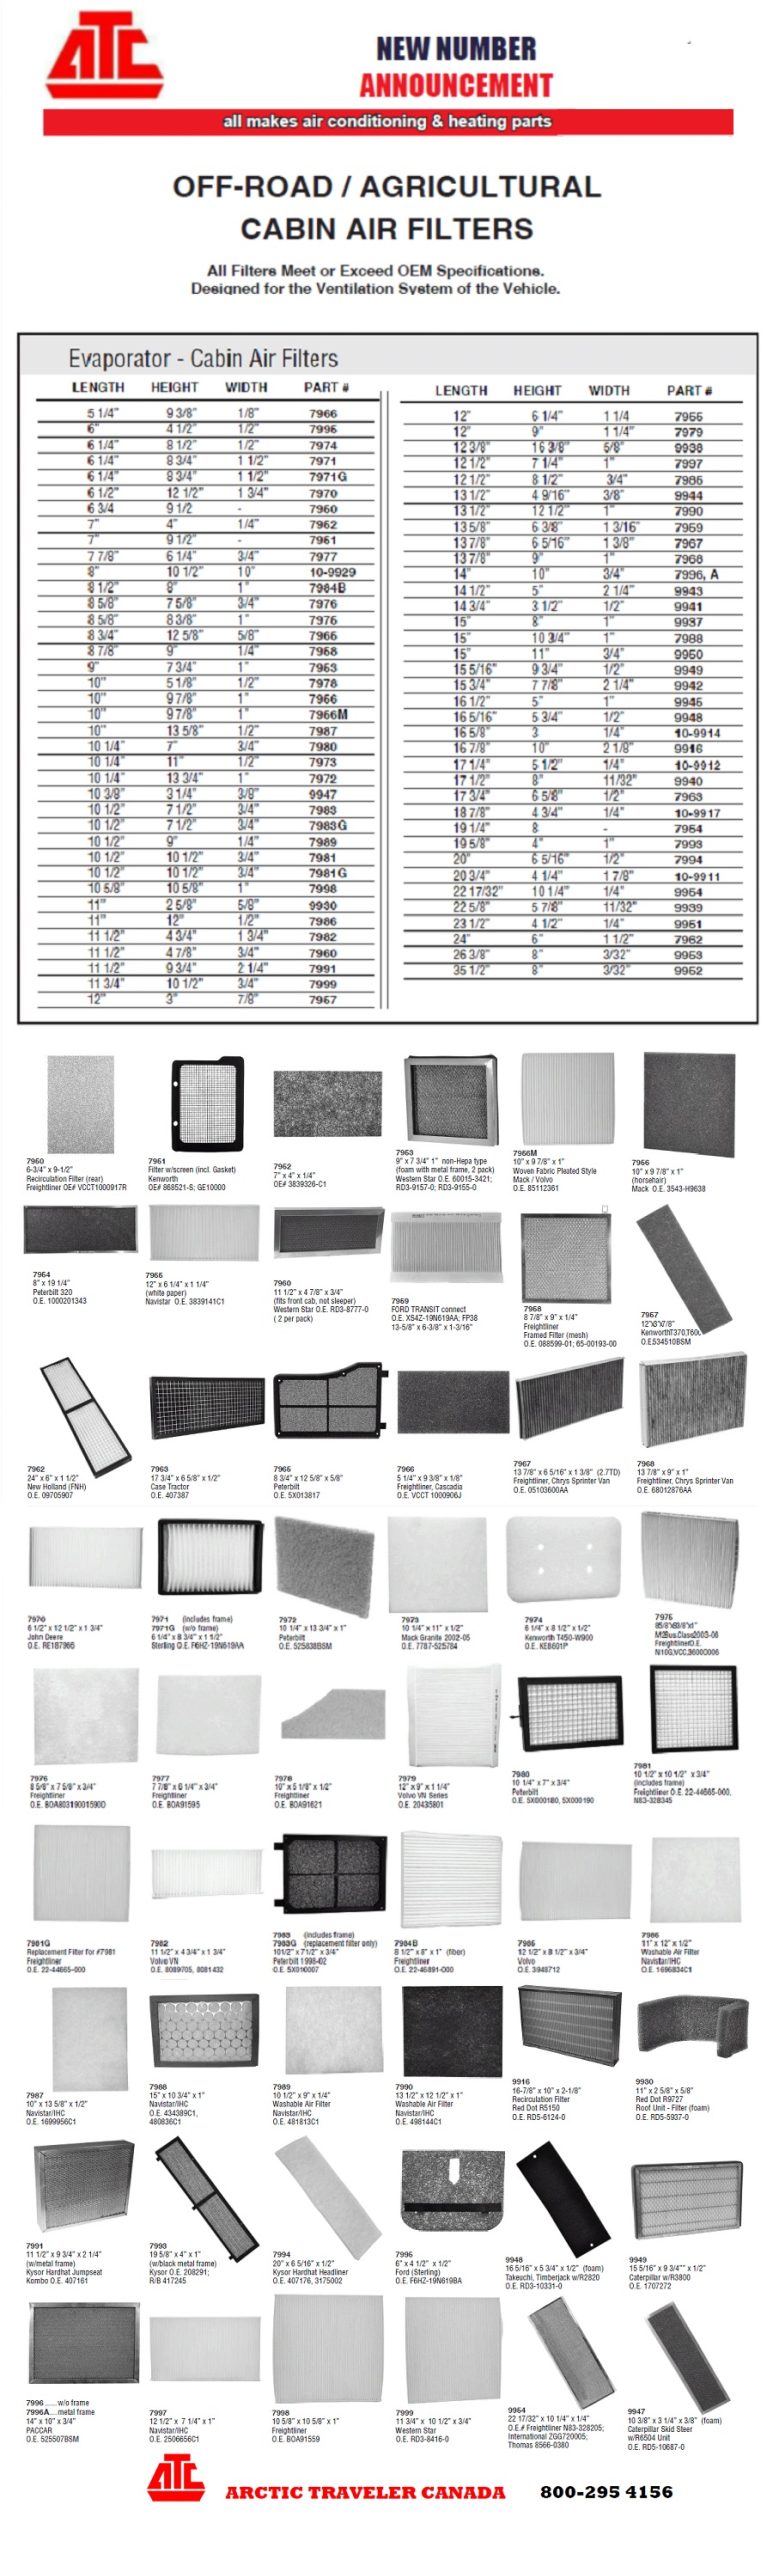
Cabin Air Filters

Cabin Air Filters – Increase A/C efficiency and Reduce dust, dirt and allergens

Replacing your cabin air filter is a relatively easy and inexpensive maintenance task that can significantly improve the air quality inside your vehicle. It’s generally recommended to replace it every 20-24,000Kms, or at least once a year, but you may need to replace it more often if you drive in dusty or polluted areas. Signs that your cabin air filter needs replacing include reduced airflow from vents, unpleasant odors, and increased allergy symptoms. 

A relatively new feature in the heavy duty industry, the cabin air filters are often overlooked in regular vehicle maintenance. That’s unfortunate because the cabin air filter is just as important to the passengers as the engine air filter is to the vehicle and a likely cause of “A/C Not Blowing Cold“. A cabin filter processes the air that enters the passenger compartment via the vehicle’s heating and air conditioning system, increasing passenger comfort by trapping particulates, pollen, and other irritants.

For people with allergies and other sensitivities to airborne agents, the cabin filter represents a significant advance. Replacing the cabin air filter at the recommended interval or sooner, especially in areas of high particulate, allows the A/C system to run at optimal efficiency and passengers to breathe cleaner, fresher air, which makes any journey more enjoyable.
Cabin Air Filters – Increase A/C efficiency and Reduce dust, dirt and allergens.